MMP Integration Guide
1. Adjust
1.1 Choose BIGO Ads network
1.1.1 Under [Campaign Lab], select [Partners].
1.1.2 Select [New partner].
1.1.3 In the [Partner selection] screen, choose the network that you want to set up. Use the [Search partners] field to search for your network, or scroll through the list to find your network.
1.1.4 Choose [BIGO], select Next.

1.2 Choose the promoted App
1.2.1 In the [App selection] screen, choose the app for which you want to create the link.
1.2.2 After you choose your app, select Next.
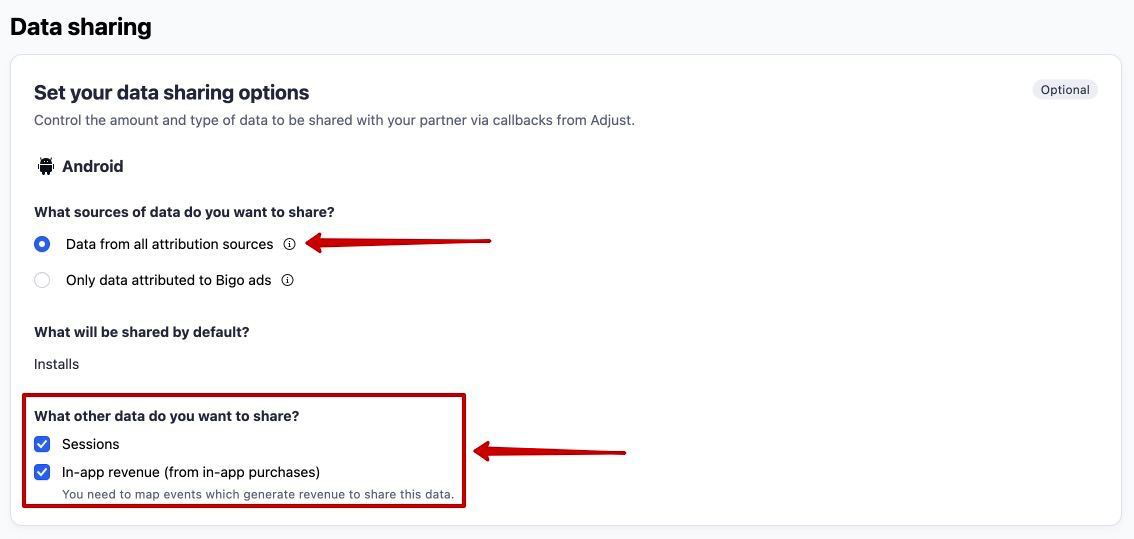
1.3 Enable data sharing
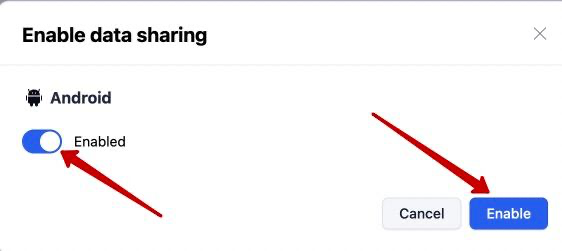
1.3.1 Enable [Data from all attribution sources], which could help BIGO Ads to optimize your CVR and in-app event performance while no impact on campaigns attribution.
1.3.2 Enable [Sessions] and [In-app revenue], which could help BIGO Ads to analyse and optimize your ROAS performance.
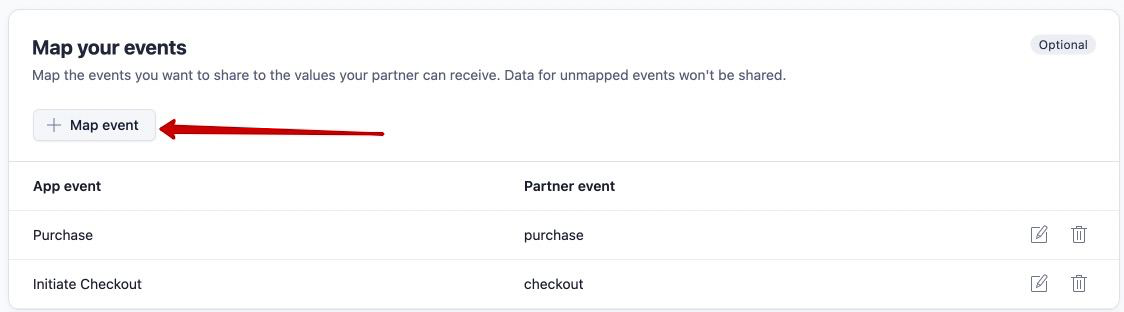
1.3.3 Event mapping: Select [+ Map event], In the [Adjust event] list, choose the Adjust event that you want to postback to BIGO Ads. In the [Partner event] list, enter a BIGO Ads event name that you want to map the Adjust event to.
Please check BIGO Ads event names in the following link.
1.4 iOS setting
To promote iOS campaingns, please enable Probabilistic Matching in Attribution Setting section.
1.5 Get the click and impression tracking links
Select [Create link] to create your click URL, impression URL, get these links to BIGO Ads ad account.
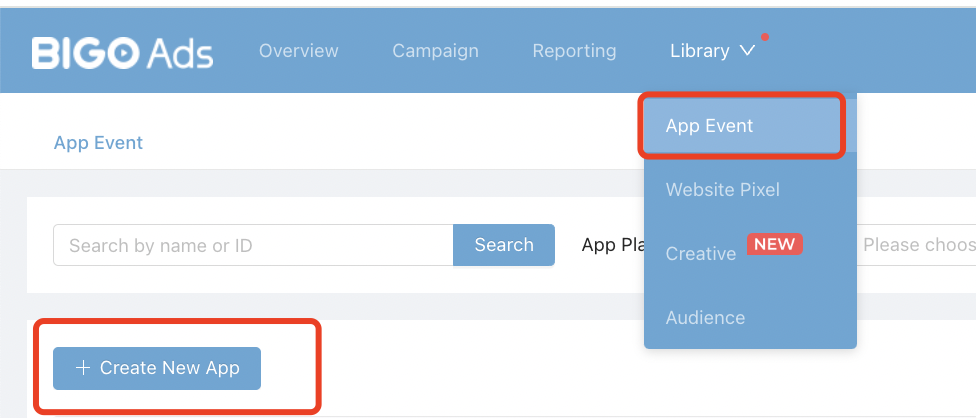
1.6 Ad account Set-up
1.6.1 Log in to ad account( https://ads.bigo.sg/ ) and go to [App Event] tap.
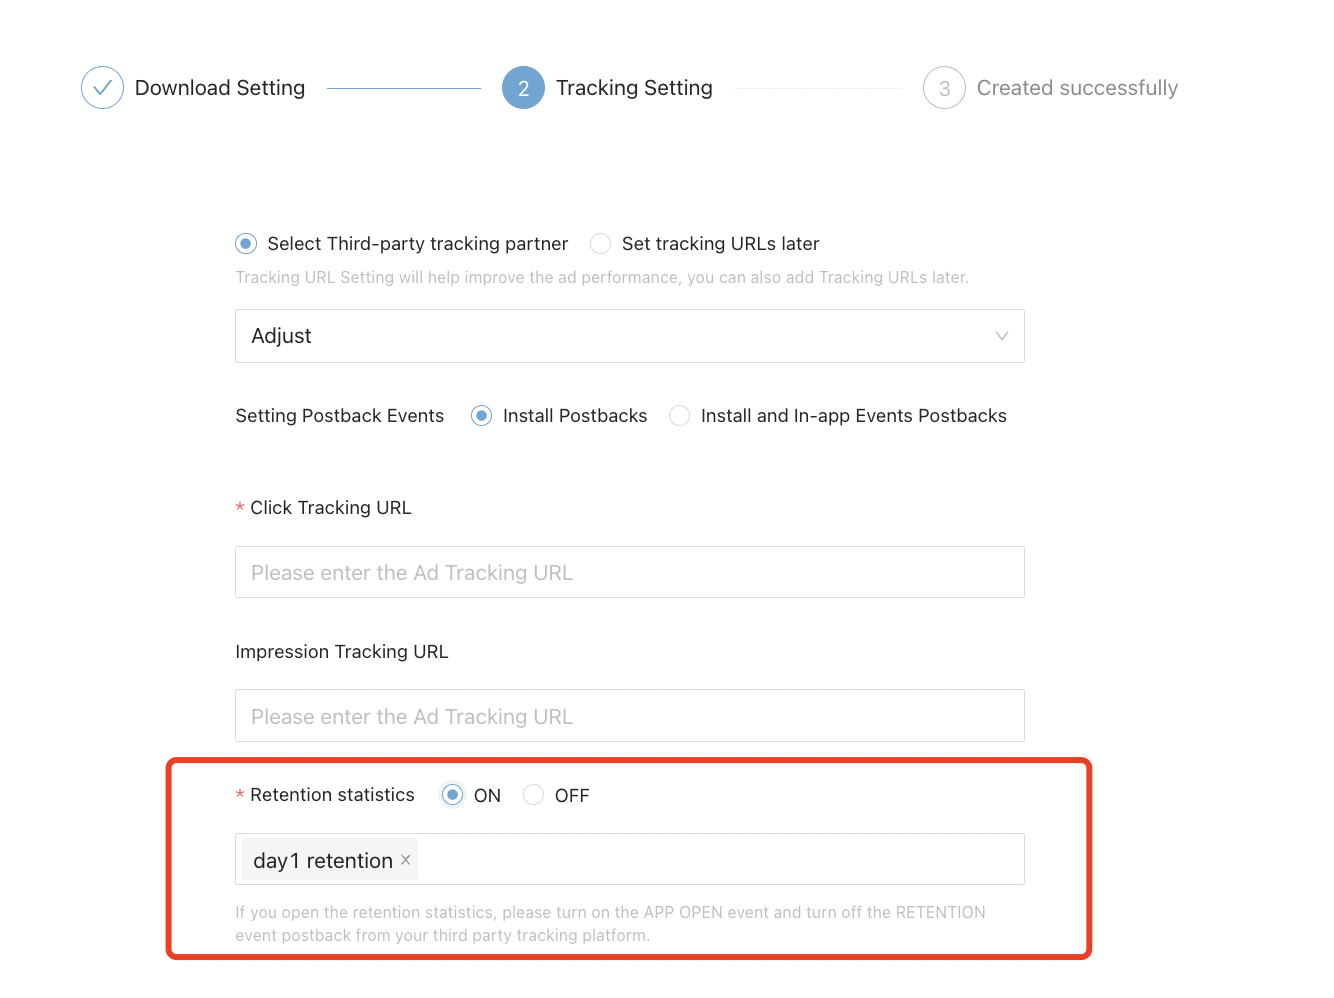
1.6.2 Choose [Adjust], fill in the click and impression tracking URLs you get from Adjust, turn on [Retention statistics] and submit.
[Important] Please enable event data post back as the instruction above, and DO NOT enter event token on Bigo Ads dashboard.
2. AppsFlyer
2.1 Get tracking links from Appsflyer
2.1.1 Search BIGO from Media source in Appsflyer dashboard and Activate Partner.
*If Activate Partner button is off, you would not able to see installs in BIGO Ads ad accounts.

2.1.2 Copy Click Attribution Link and impression Attribution Link.
2.2 For iOS Campaign
2.2.1 If you are going to promote iOS app, please ensure Advanced Privacy is OFF in both client and your agency Appsflyer accounts.
* Without this button off, conversions cannot be attributed to BIGO Ads correctly.
If you are advertisers, and cannot turn it off, please turn off [Aggregated Advanced Privacy] in setting first.
If you are agency/network and cannot turn it off, please ask client to authorize your appsflyer account to turn it off.
2.2.2 If VTA (view-through attribution) is enabled for your iOS offer, please also turn on “Probabilistic Modelling” under [App Setting].

2.3 Set up in-app events postback
We deeply recommend clients to set event postback to BIGO Ads. By doing so, you would be able to see in-app events in ad account, and after accounts accumulate enough event data, you could start AEO with deep goal or bid for in-app event directly, which in general could improve in-app event rate 30%.
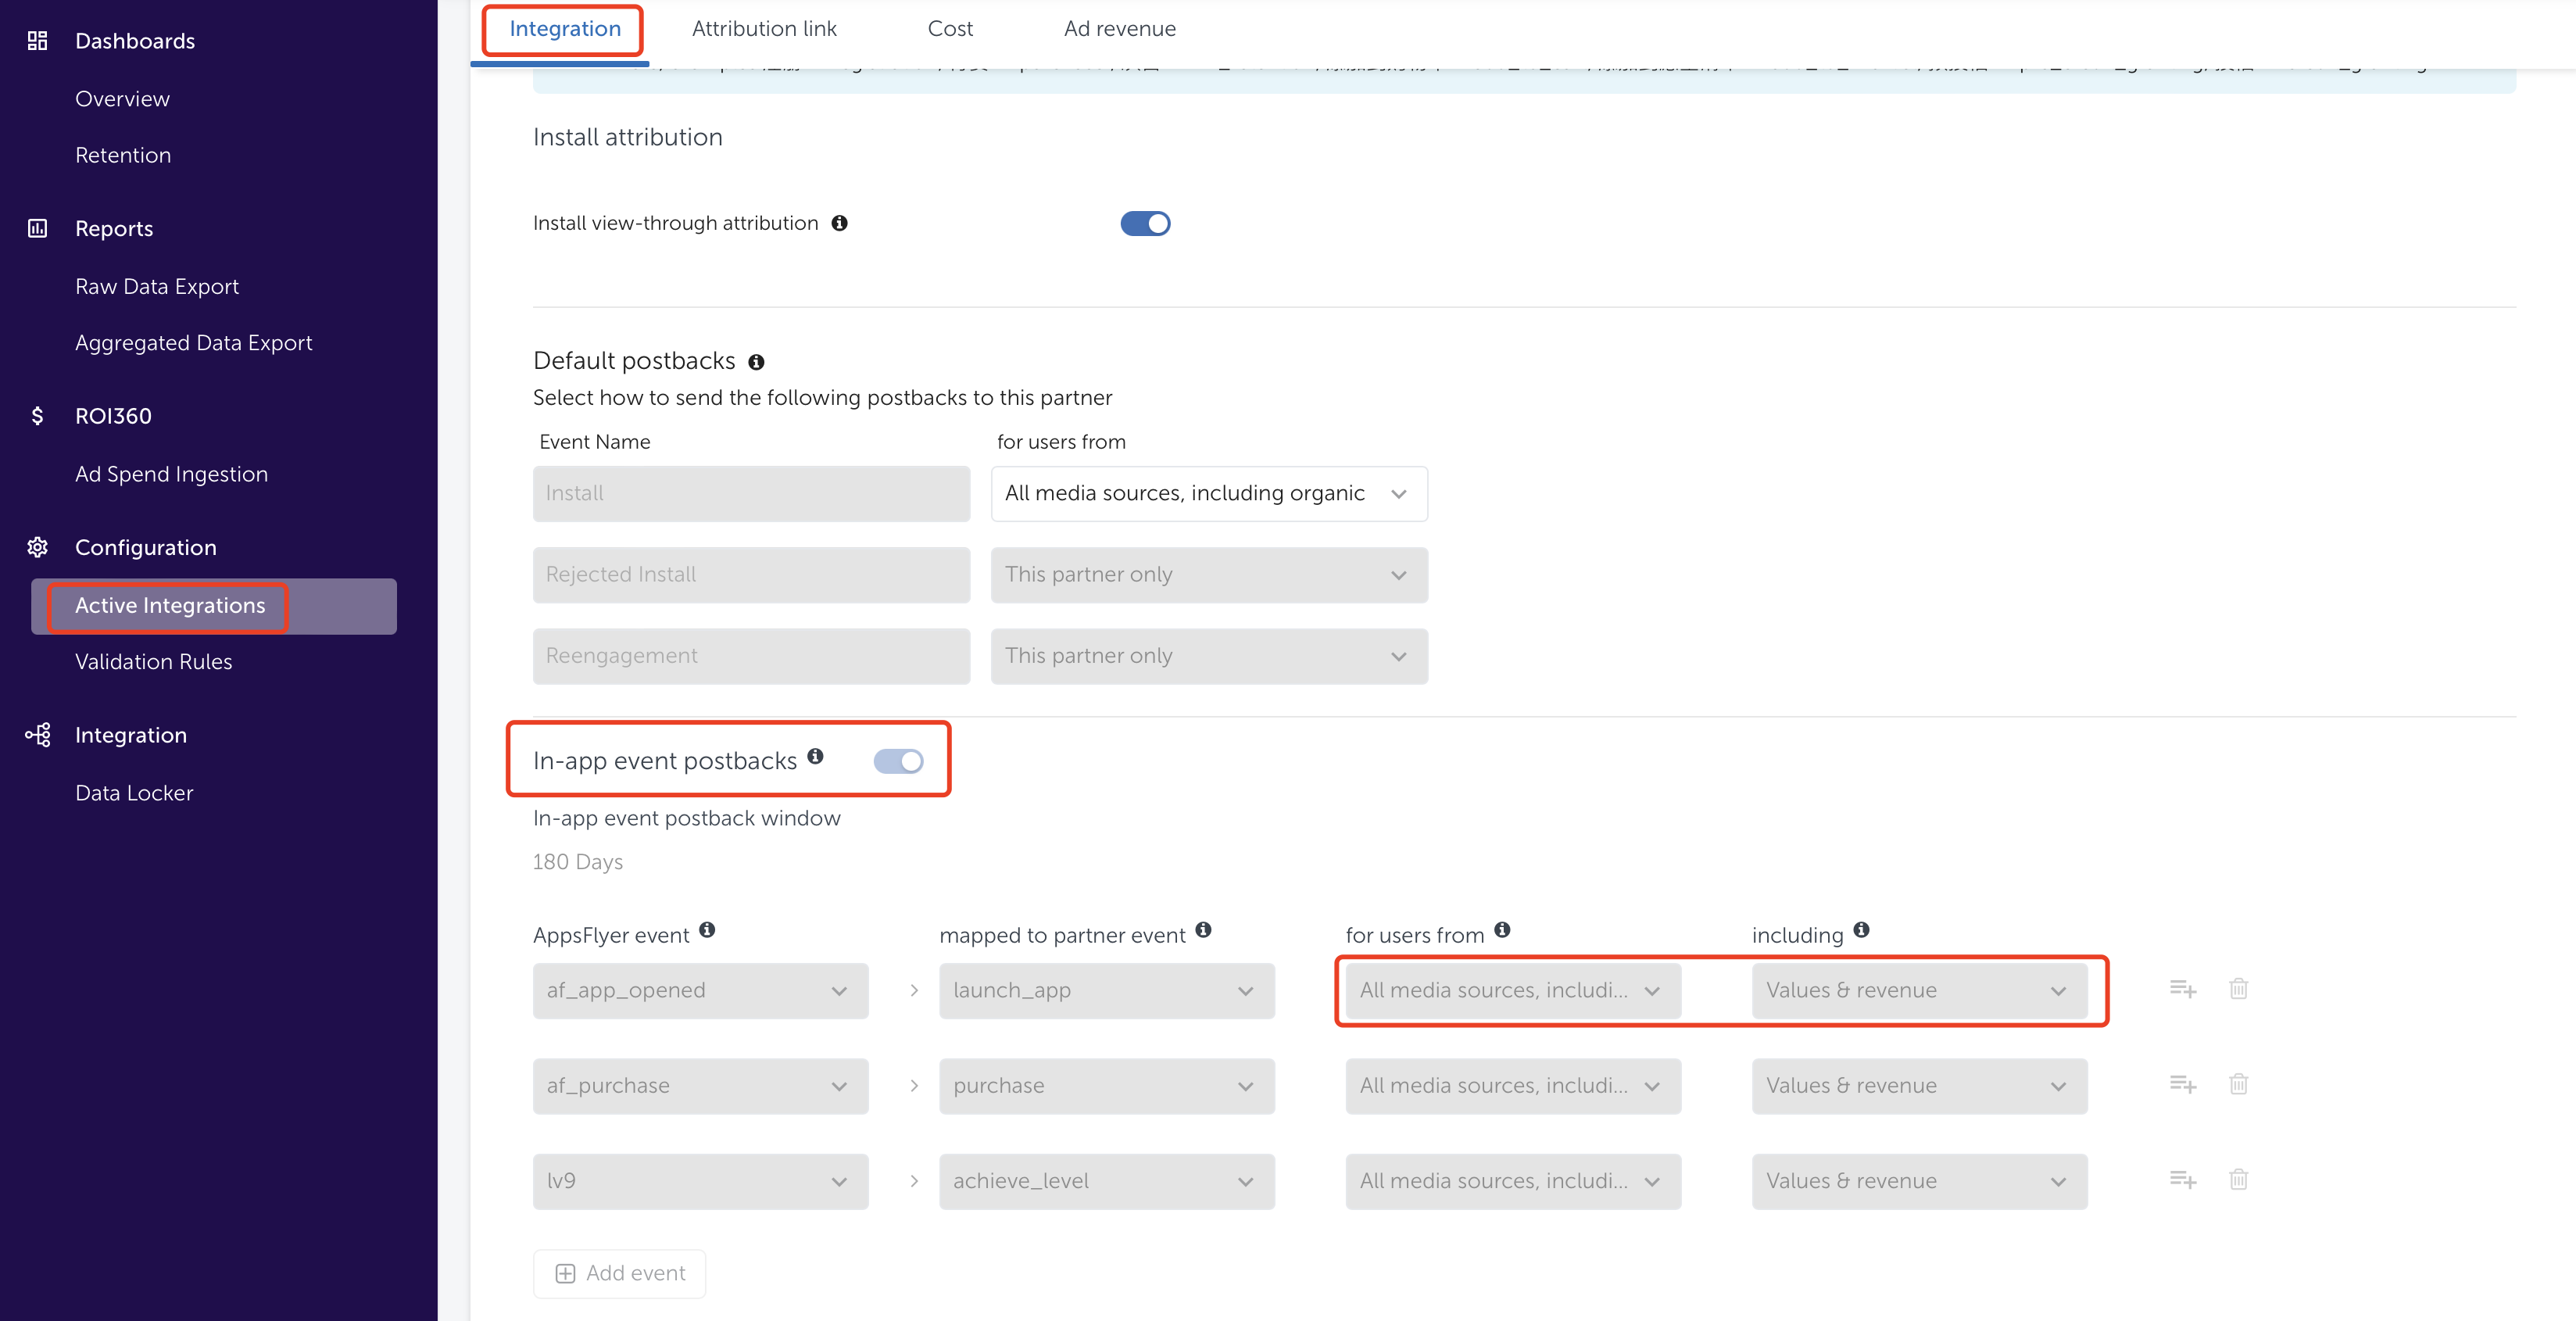
2.3.1 Go to [Active Integrations]- find [BIGO Ads]-[Integration].
Turn on the ‘In-app event postbacks’ button.
Choose events from the picklist for both [Appsflyer event] and [mapped to partner event], for events related to revenue, choose ‘Value & revenue’ in [including] column to postback both event number and revenue.
2.3.2 Bigo Ads Standard Events
2.4 Set up in Bigo Ads accounts
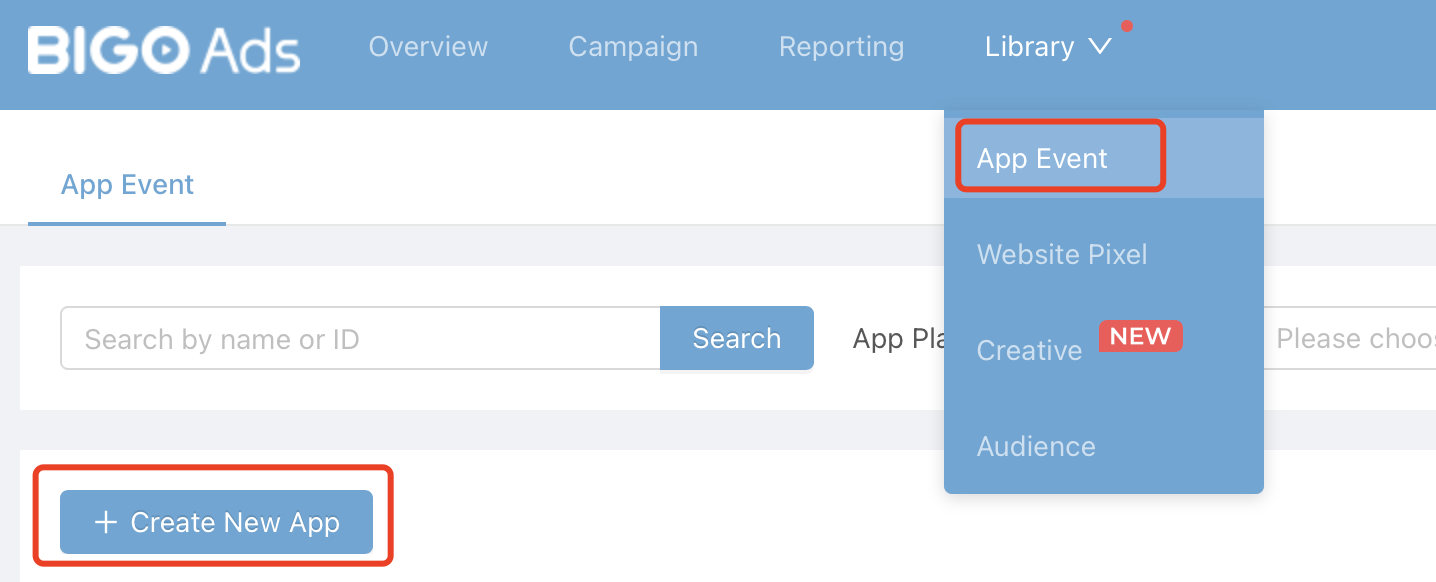
2.4.1 Log in to ad account(https://ads.bigo.sg/) and go to [App Event] tap.
2.4.2 Choose [Appsflyer] and fill in Click tracking url and Impression tracking url, submit.
2.5 All-medias install and event postback
2.5.1 Purpose: Enable BIGO Ads to receive all installs and events, including attributed and non-attributed ones, which could help BIGO Ads to optimize your CVR and in-app event performance. Recommend to have this set-up. No impact on campaigns attribution.
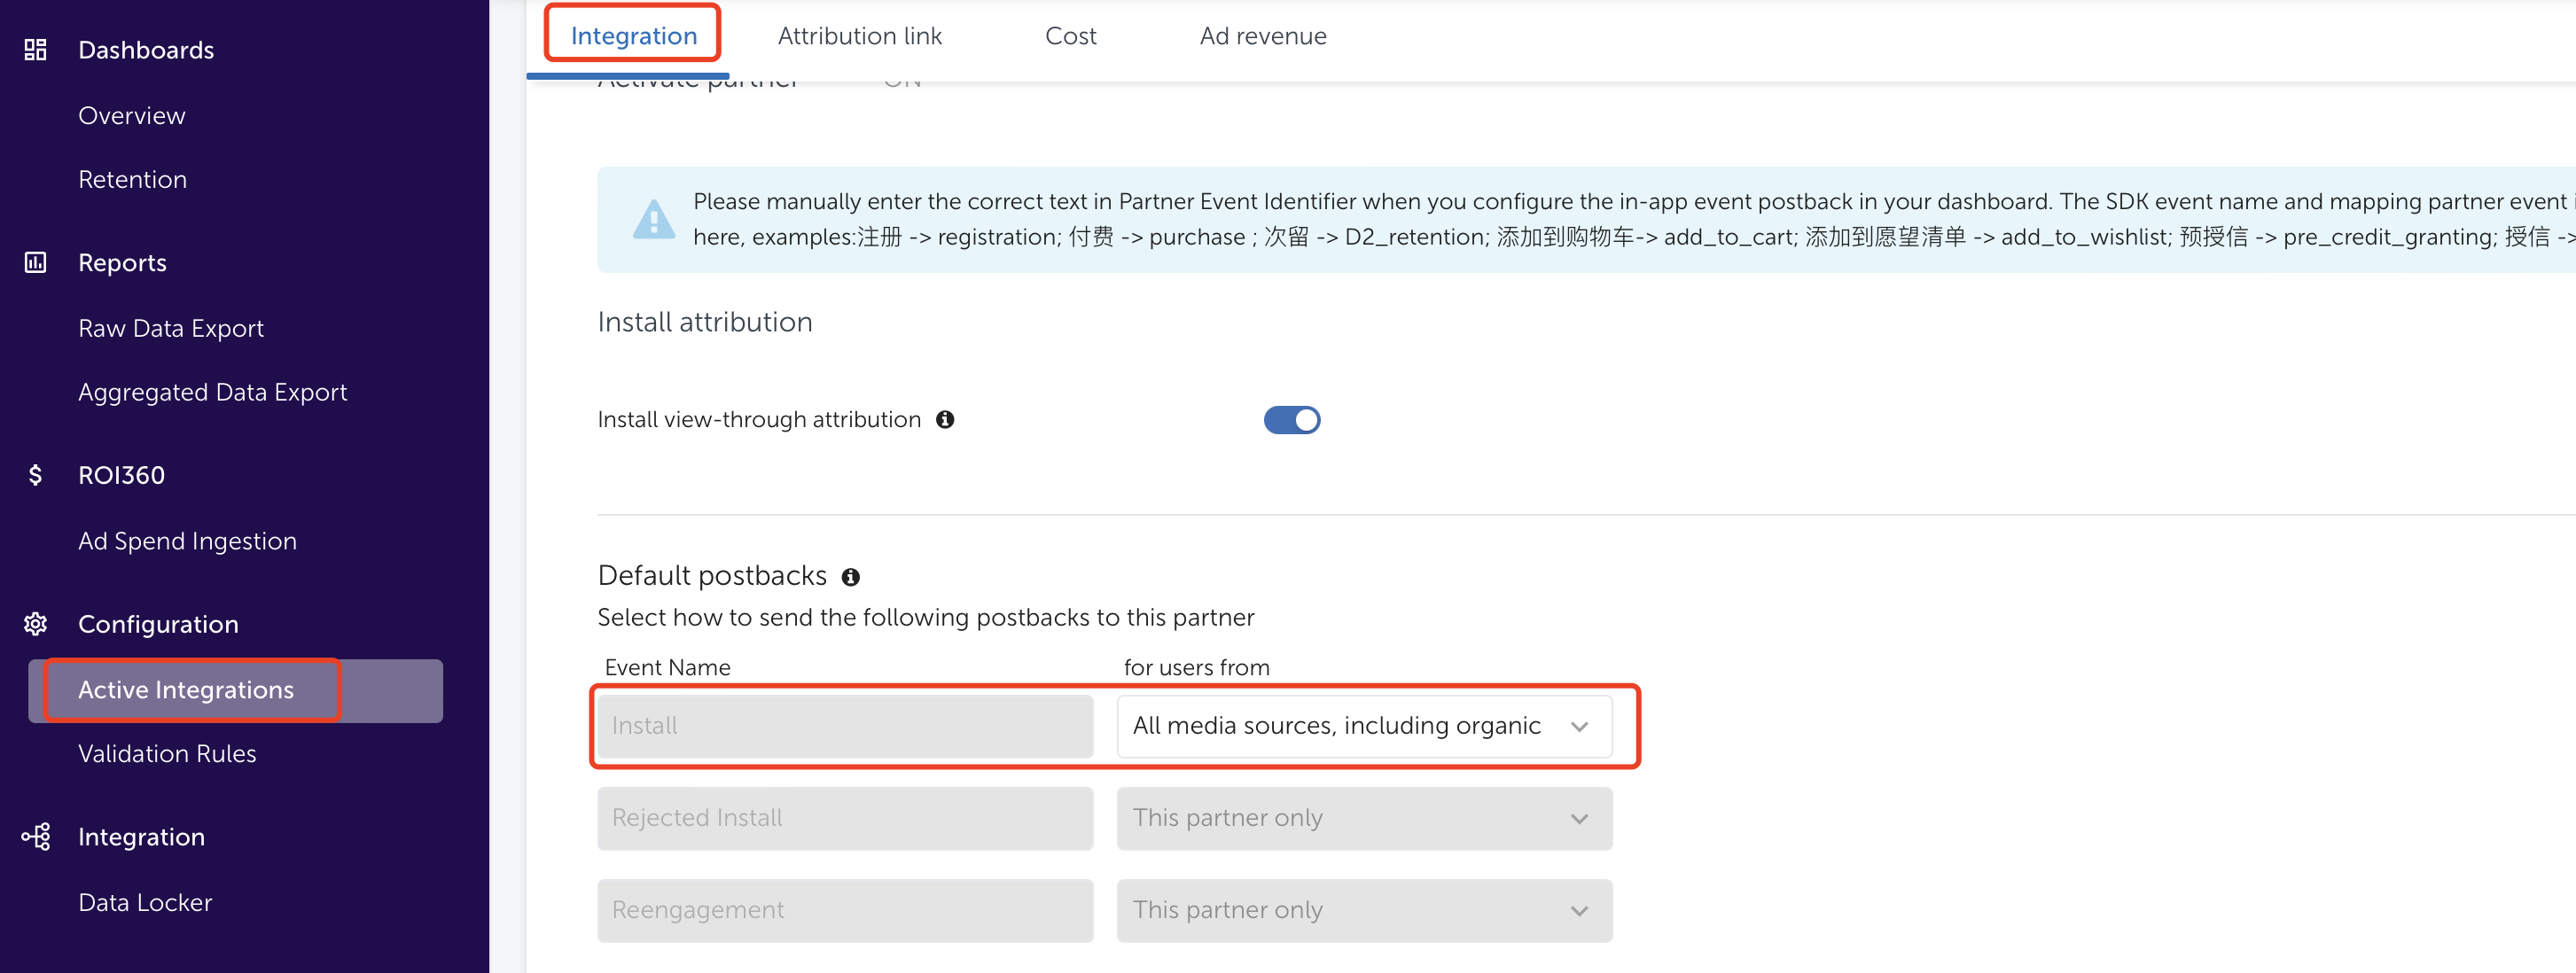
2.5.2 All-media Installs postback
In AppsFlyer dashboard, find BIGO Ads media, and check [Default postbacks], manually change [for users from] choice to ‘All media sources, including organic’.
2.5.3 All-media In-app events postback
Go to Appslfyer, find BIGO Ads media, check [In-app event postbacks], map your events from [AppsFlyer event] to [mapped to partner event], and manually change [for users from] choice to ‘All media sources, including organic’.
You can find standard event names of Bigo Ads in this link: Bigo Ads Standard Events.
2.6 Common Q&As
6.1 Can I see the cost of BIGO Ads media in Appsflyer?
Yes, just go to Appsflyer, find BIGO Ads media, and turn on the Cost button as the screenshot.
But please noted that only Advertiser(client) have authorization to turn on, Agency/Network cannot.
6.2 I am an Agency/Reseller/Network, and I want to see conversions in my Appsflyer agency/network account, what should I do?
You could choose either option A or B, recommend to use A.
A. Ask for client’s authorization on media activation, event postback set up and advance privacy set up, and use your Appsflyer agency/network account to execute all steps 1, 2, and 3 above.
B. If client insist on no additional authorization, please share step 1-3 to client, and ensure correct set-up.
After client provides click and impression tracking urls to you, you need to manually add ‘&af_prt=replace with your partner name’, check the example: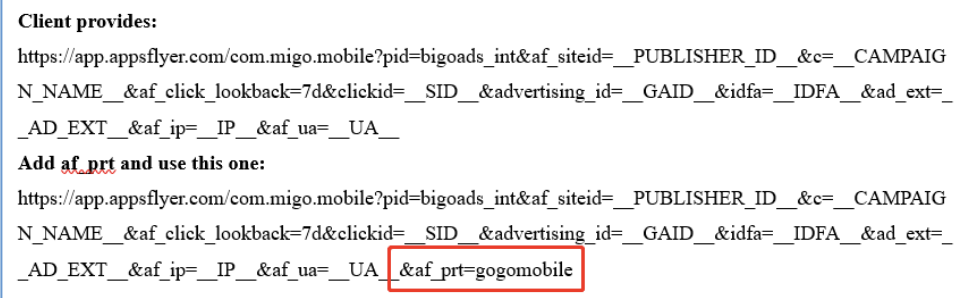
3. Kochava
3.1 Get click&impression tracking urls on Kochava dashboard
3.1.1 Path: “Links”-“Campaign Manager”-“Add a Tracker”.
3.1.2 Create a new campaign and segment.
3.1.3 Name this campaign, choose “BIGO Ads - Android” as Media partner.
If you need agency to run the campaign for you, choose your agency partner.
3.1.4 Save the setting and go back to “Campaign Manager” page.
3.1.5 Click on the campaign name to get click and impression tracking urls.
3.2 Set up Install post back
This step is very important, otherwise, you cannot receive or see install in BIGOAds platform.
3.2.1 Path: “Apps&Assets” - “Partner Configuration” - “Add a Configuration”.
3.2.2 Choose “BIGO Ads – Android” as Media Partner, and if you have an Agency to run campaign for you, you need to choose the Agecny and BIGO Ads media at the same time*.
*[IMPORTANT] otherwise, postback will missing SID macros and you cannot see install in BIGOAds platform.
3.2.3 Save the new configuration.
3.2.4 Select Install > Postback Tools (⋮) > Edit.
3.2.5 Click “Go”.
3.3 Set up In-app Event postback
3.3.1 Choose the events that want to postback to BIGO Ads.
3.3.2 Fill in (1) you app store id, same as your bundle id; (2) fill in BIGO Ads event value; (3) Save.
3.3.3 Bigo Ads Standard Events:
4. Appmetrica
4.1 Create Tracker
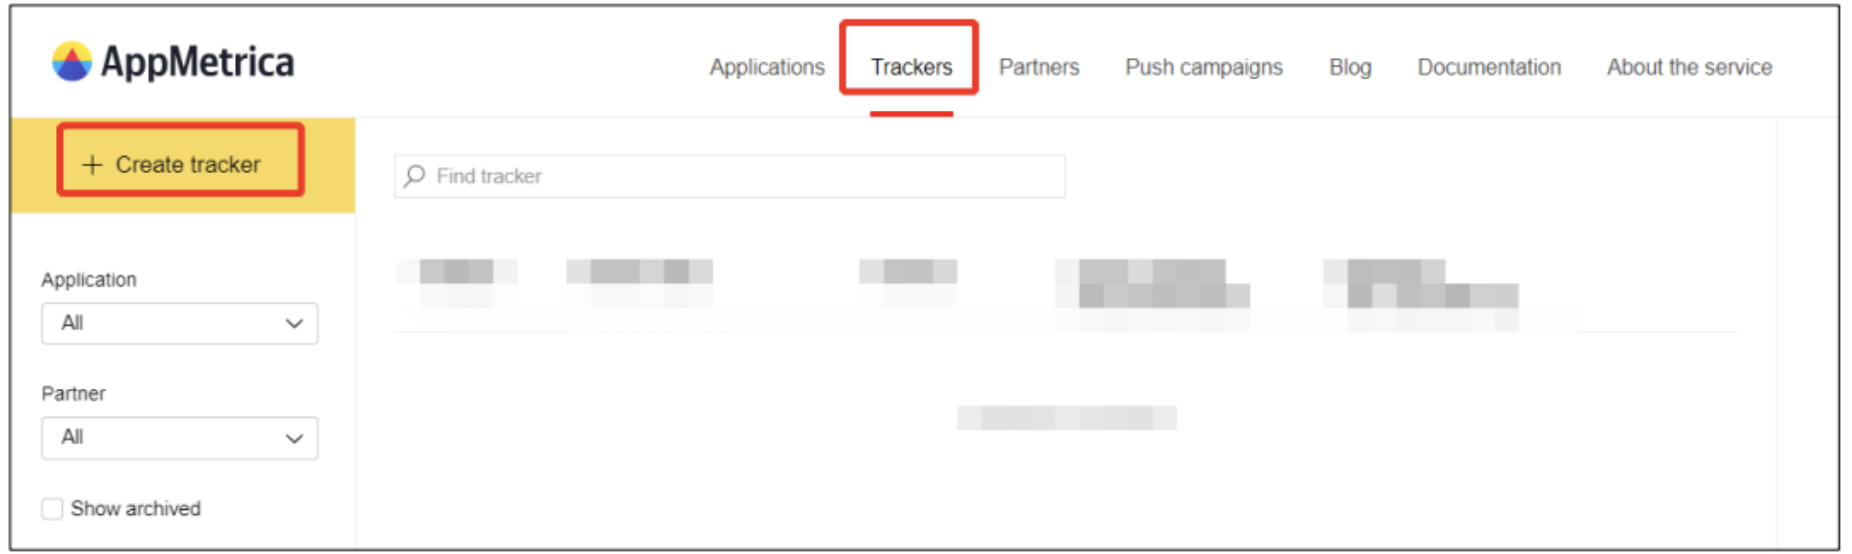
4.1.1 In Appmetrica Interface, go to [Trackers] and create a tracker.
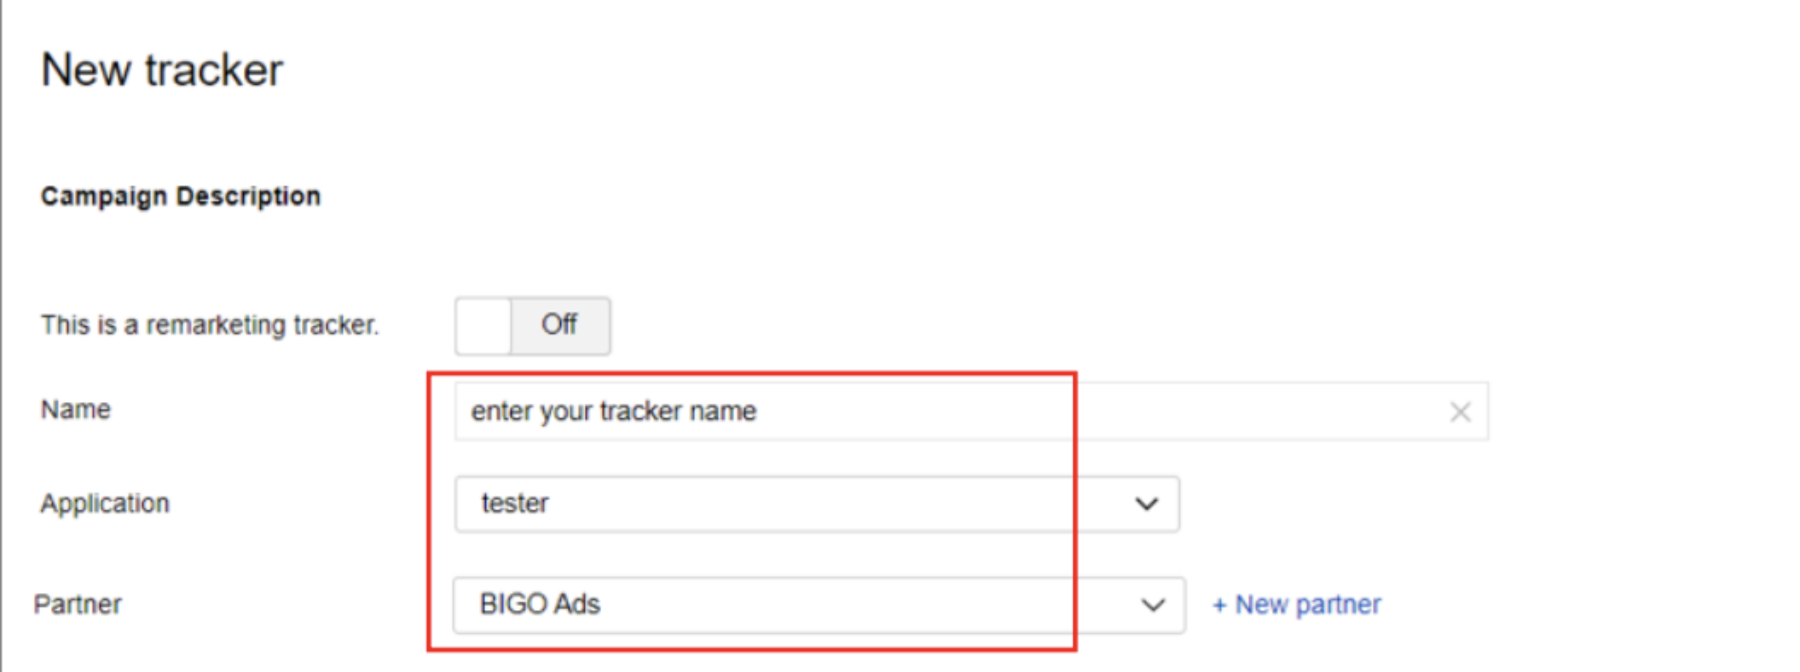
4.1.2 Edit Tracker name, choose your app, and choose ‘BIGO Ads’ in Partner.
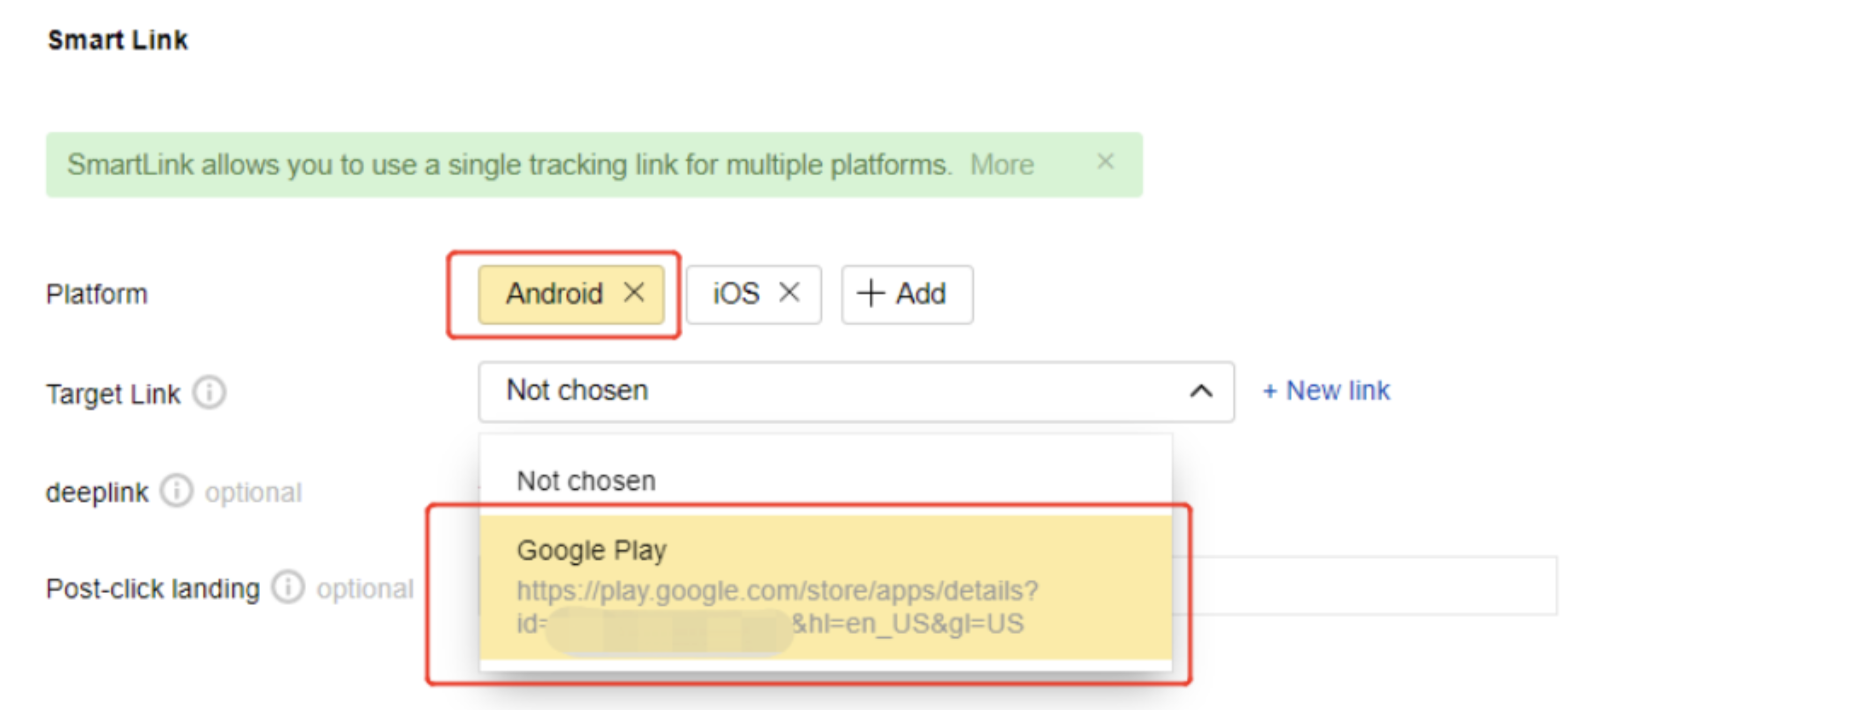
4.1.3 Choose OS and the corresponding store page.
4.1.4 No action needed for Attribution setup.
4.2 Install postback set up
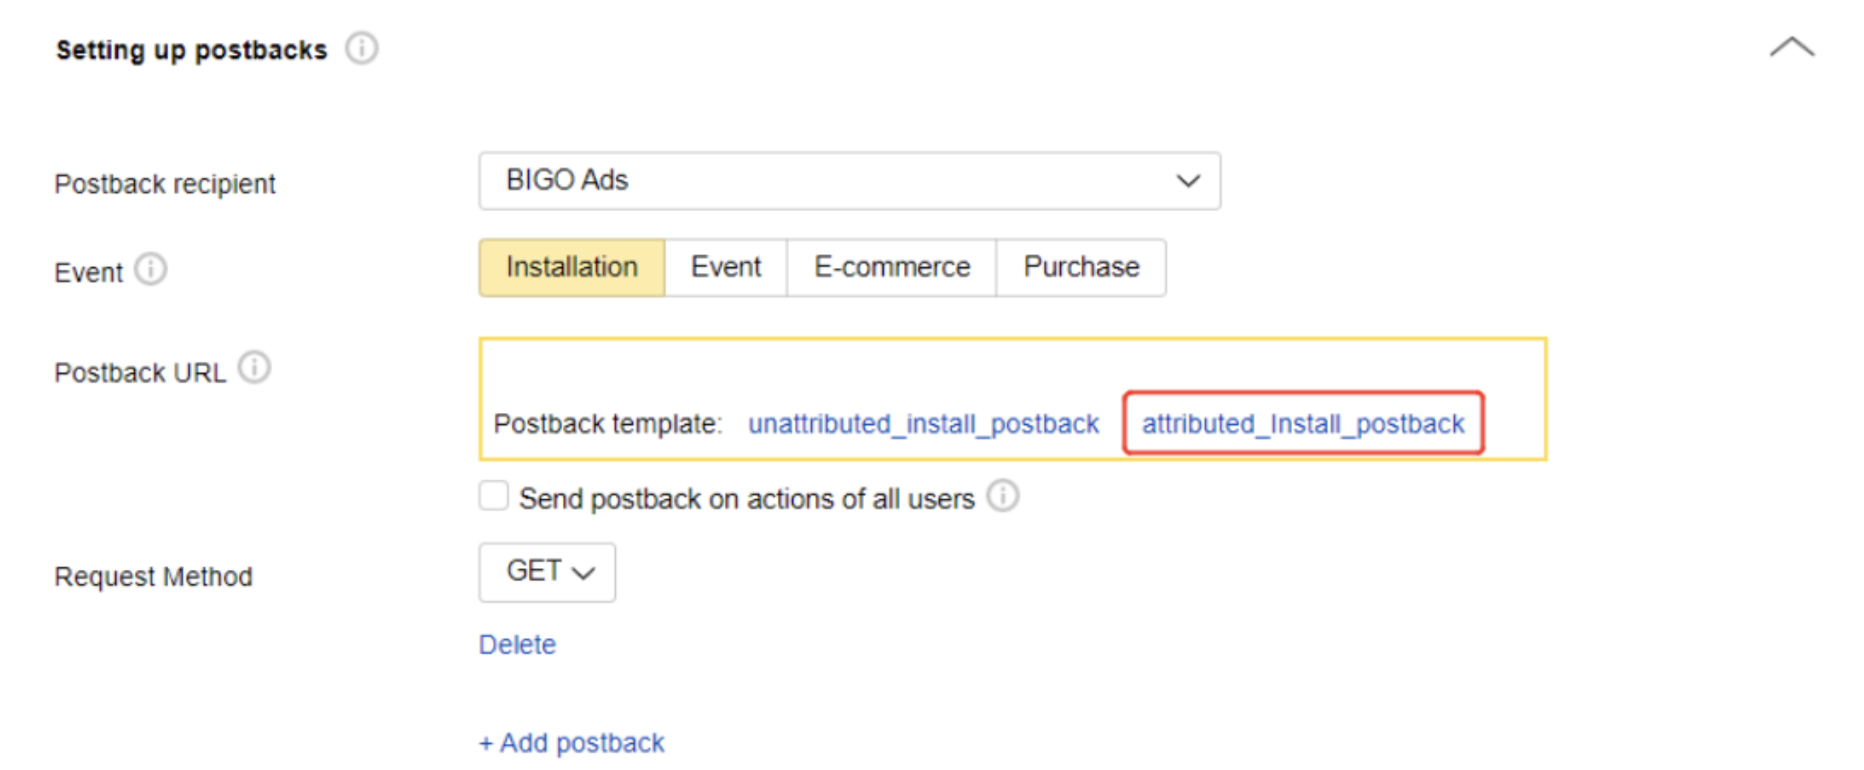
4.2.1 Mandatory: Attributed install postback setting:
Choose [Installation] and click on “attributed_install_postback” to fill in default template.
Not recommend to amend/add/remove any parameter in the template.
Do not choose [Send postback on actions of all users].
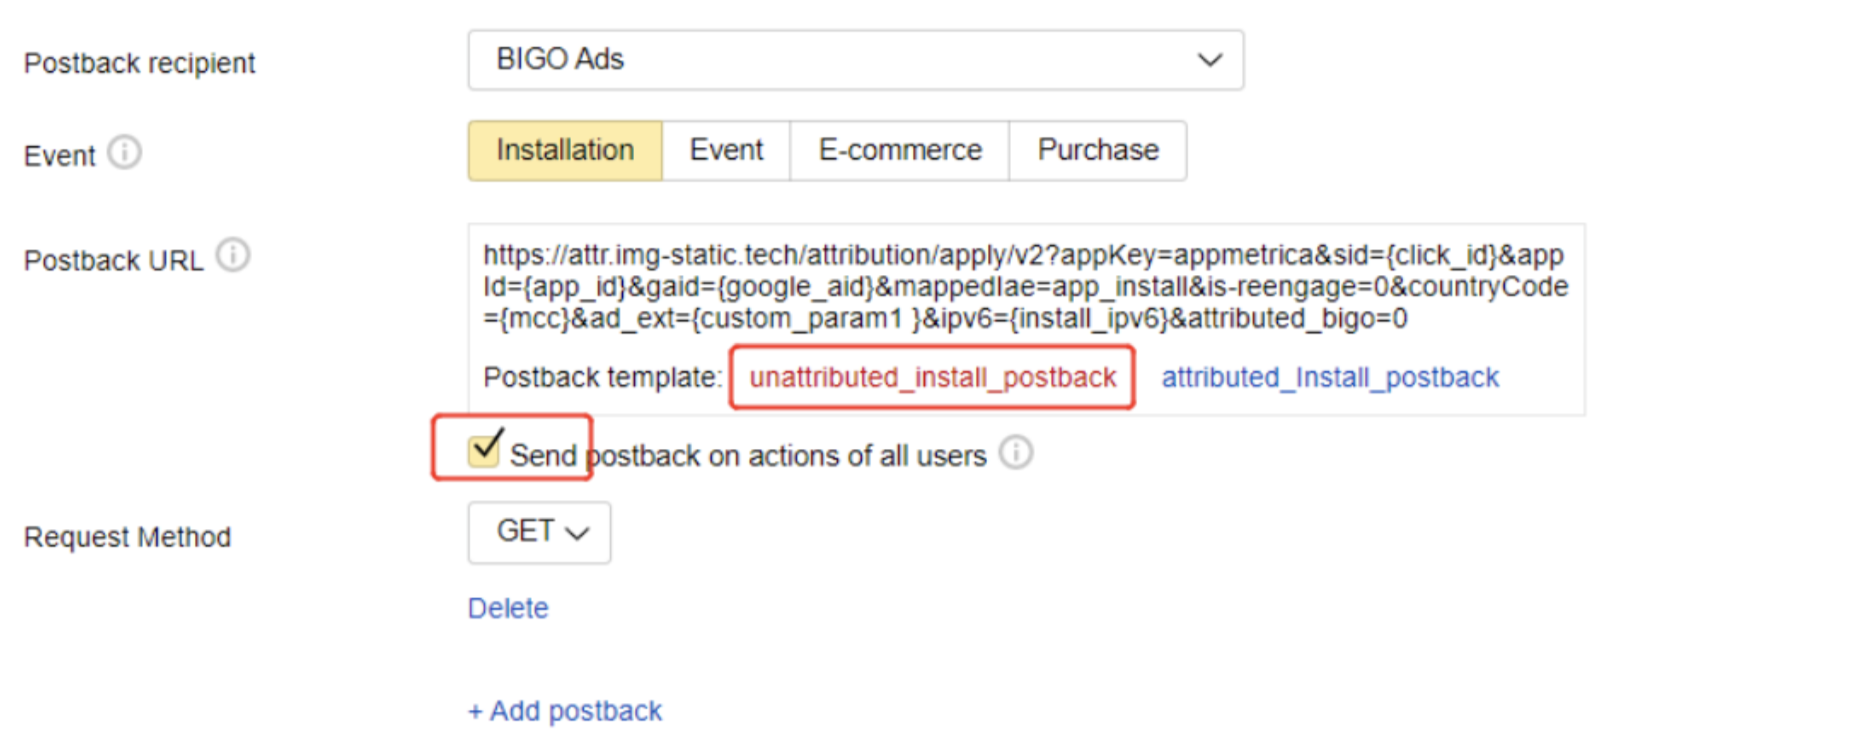
4.2.2 Additional: If you need to send all users (including users attributed to bigoads and other medias) to Bigoads for better system learning, keep the install postback above and add a new installation postback for unattributed installs following steps below:
a. click on [+ Add postback].
b. choose [Installation].
c. click on “unattributed_install_postback” and choose [Send postback on actions of all users].
4.3 Event postback set up
Click on [+ Add postback] to add Event postback under Installation.
Choose [Event], pick up your in-app event from the list, and choose the corresponding template.
Bigo Ads Standard Events: Bigo Ads Standard Events

4.4 Get Tracking Link
Save the setting and copy to get your click tracking url.
4.5 Bigo Ads Set Up
Go to Bigoads ad account, and fill in click tracking url for your app.

4.6 Reference
If you need more detail about Appmetrica integration, please find its official document: Appmetrica Tracking Guide
5. Branch
5.1 Manage Partner
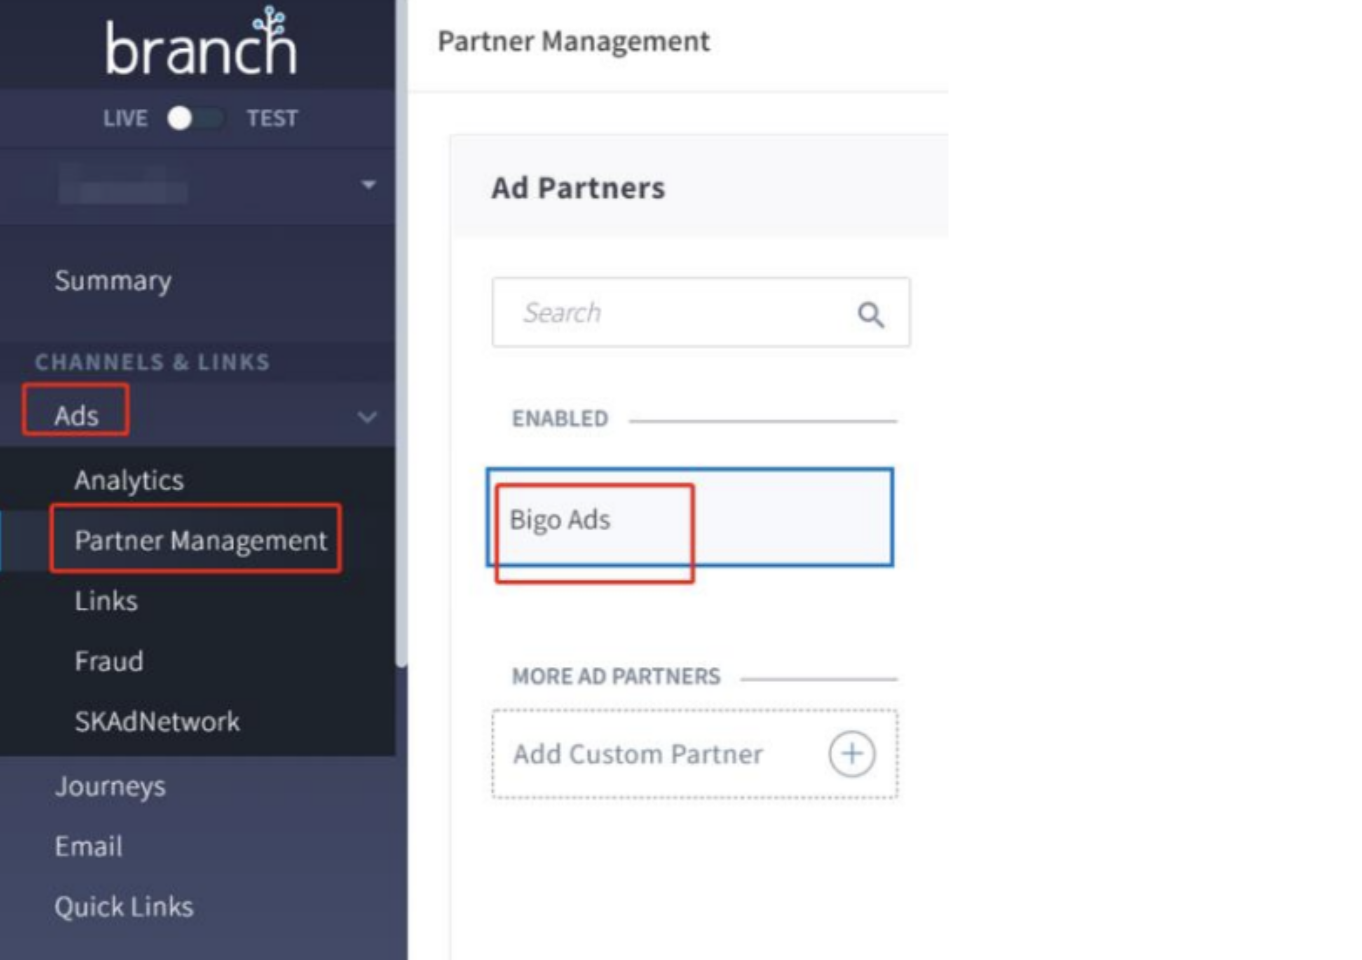
Go to Branch dashboard and choose [Ads] – [Partner Management], and choose Bigoads from Ad Partners.
5.2 Postback Configuration
Go to [Postback Config] under Bigo ads to set up postback.
5.2.1 Click on [Add new postback] to add install and in-app events postback.
5.2.2 fill in Goal id for install and all events.
Missing goal id or any additional space or typo could bring postback errors. if you don’t know how to fill in Goal id, click to check this form.
5.2.3 Select [Enable] columns for each postback.
5.2.4 Save your setting and get click tracking url.
5.2.5 Click on [Create Bigo Ads Link] to generate click and impression tracking urls.
5.3 Get Tracking Link
Create ad link and get your click and impression tracking urls.
5.3.1 Choose [App install or Engagement].
5.3.2 Name this ad link, ensure partner is Bigo Ads and click to [Save].
5.3.3 Get click and impression tracking urls.
5.4 Bigo Ads Set Up
Go to Bigoads ad account, and fill in click and impression tracking url for your app.
5.5 Branch Reference
If you need more detail about Branch integration, please find its official document:
About Postback configuration: Postback Configuration
About Ad link creation: Ad Link Creation