Pixel Integration Process
1. Pixel Introduction
The Bigo pixel is a snippet of JavaScript code implemented on your website/landing page that helps to track visitor activities on your website.
Tracked conversions appear in Bigo Ads dashboard and in the Reporting, where they can be used to:
- Measure the result of the ads.
- Use oCPC to drive event results.
1.1 Install pixel code by 3rd party tool:
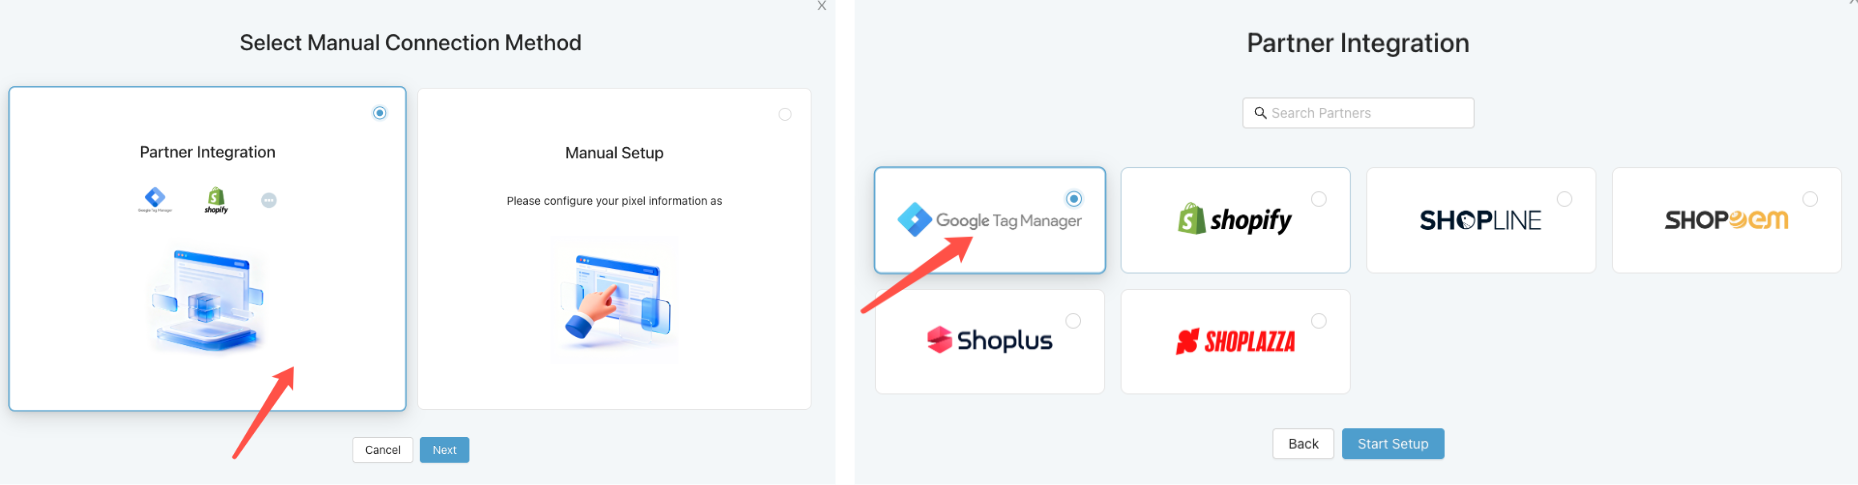
1.2 Install pixel code by manully pixel *[Main content of this guideline]👇
2. Manully Pixel Create Process
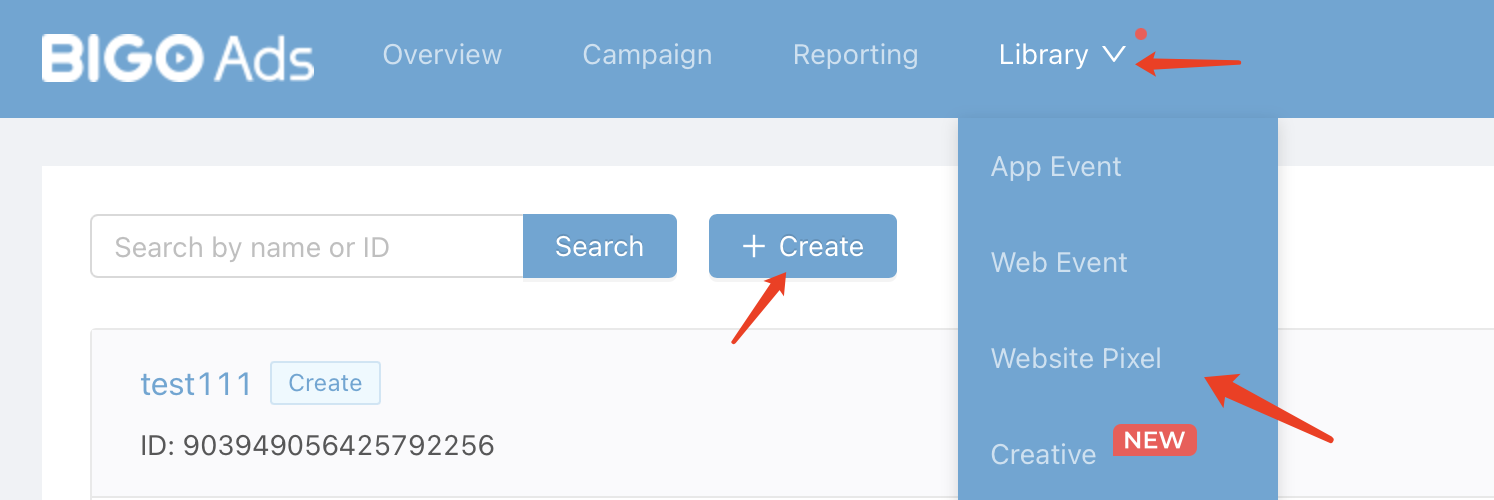
2.1 Get an ad account in BIGOAds platform
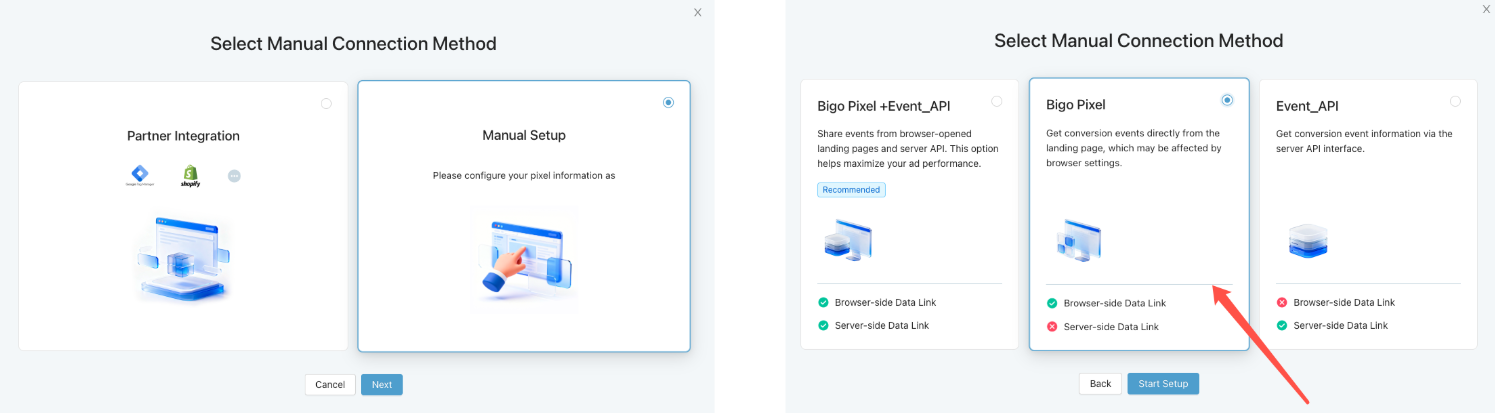
2.2 Create Pixel: Path: [Library]→ [Website Pixel]→[Create]→[Manual Setup]→[Bigo Pixel]. Enter a Pixel name.
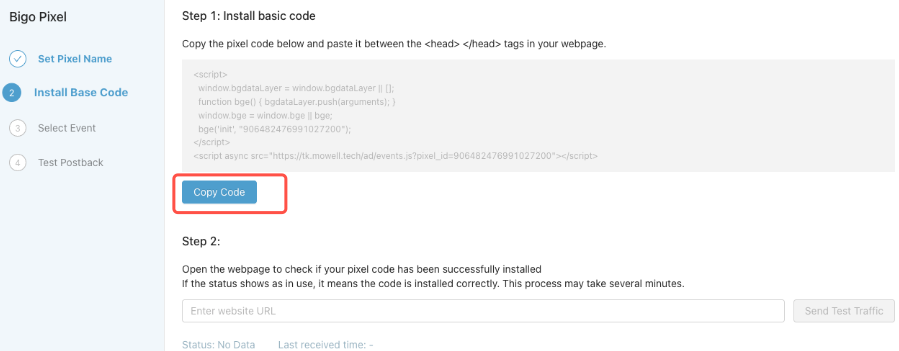
3. Implement Base Code
Manually Install pixel code:
3.1.Copy the pixel base code.
3.2 Paste the pixel base code into your pages between <head> tag and </head> tag.
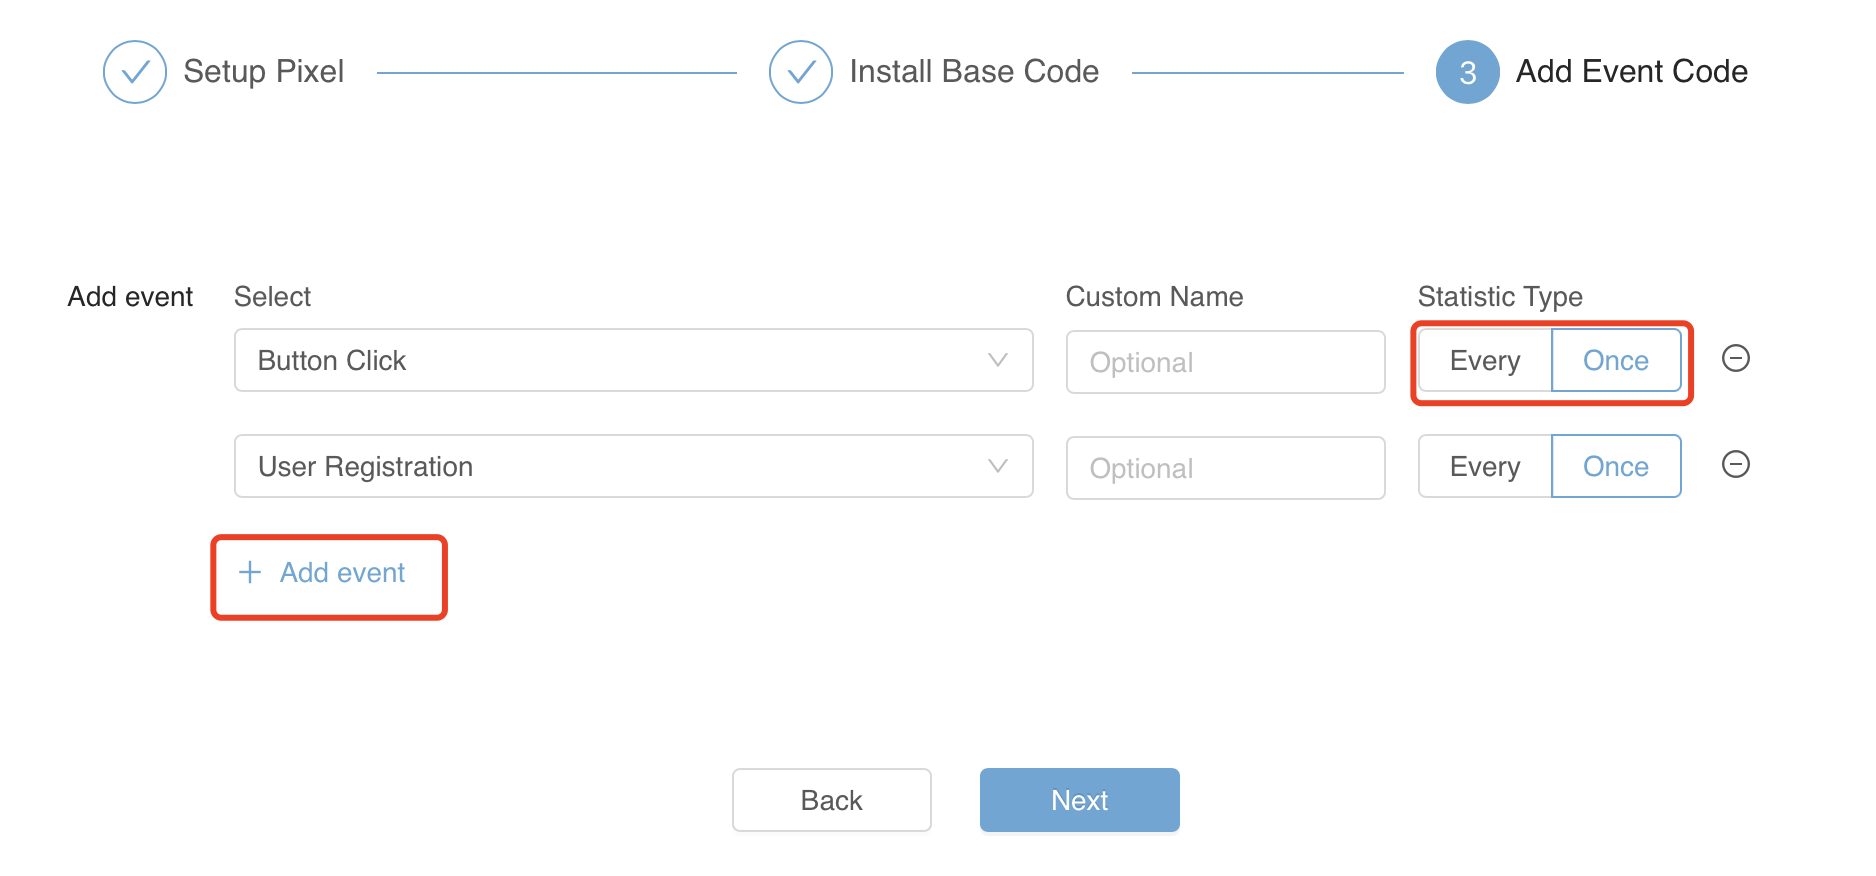
4. Select Your Target Event
Select events that you want to track in the picklist.
4.1 You can definite if event would be triggered every time or just for one time by each GAID.
4.2 You can name different events under ‘custom name’, which we will show the corresponding name in detail page. 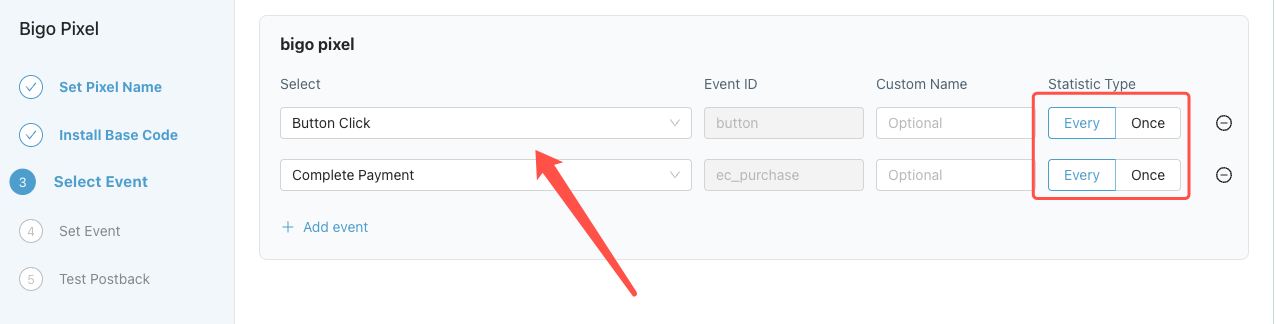
5. Implement Event Code
2 methods to set up event code:
- Standard mode: for non-technical users, set up event tracking on a visual page.
- Developer mode: for users with technical knowledge, implement event codes in the page coding.
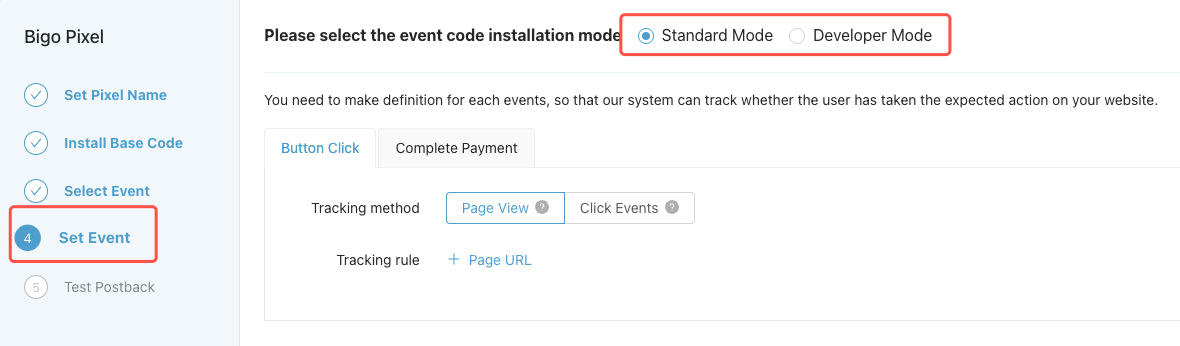
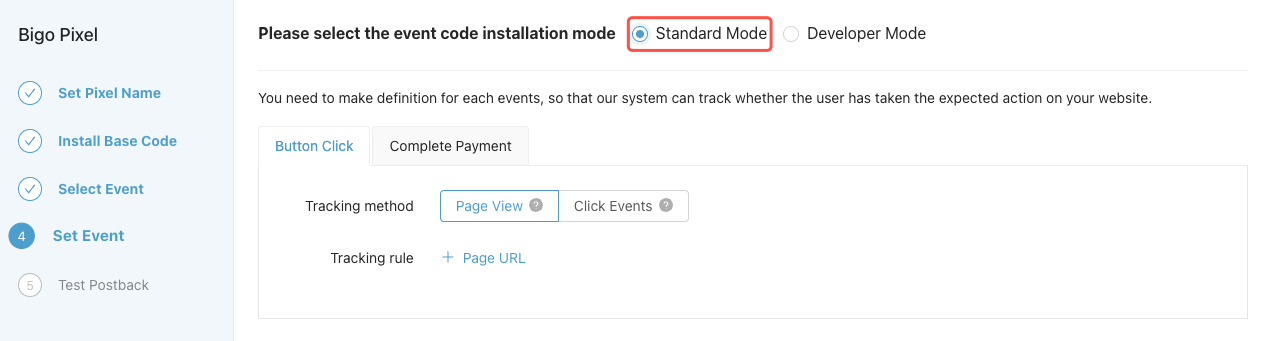
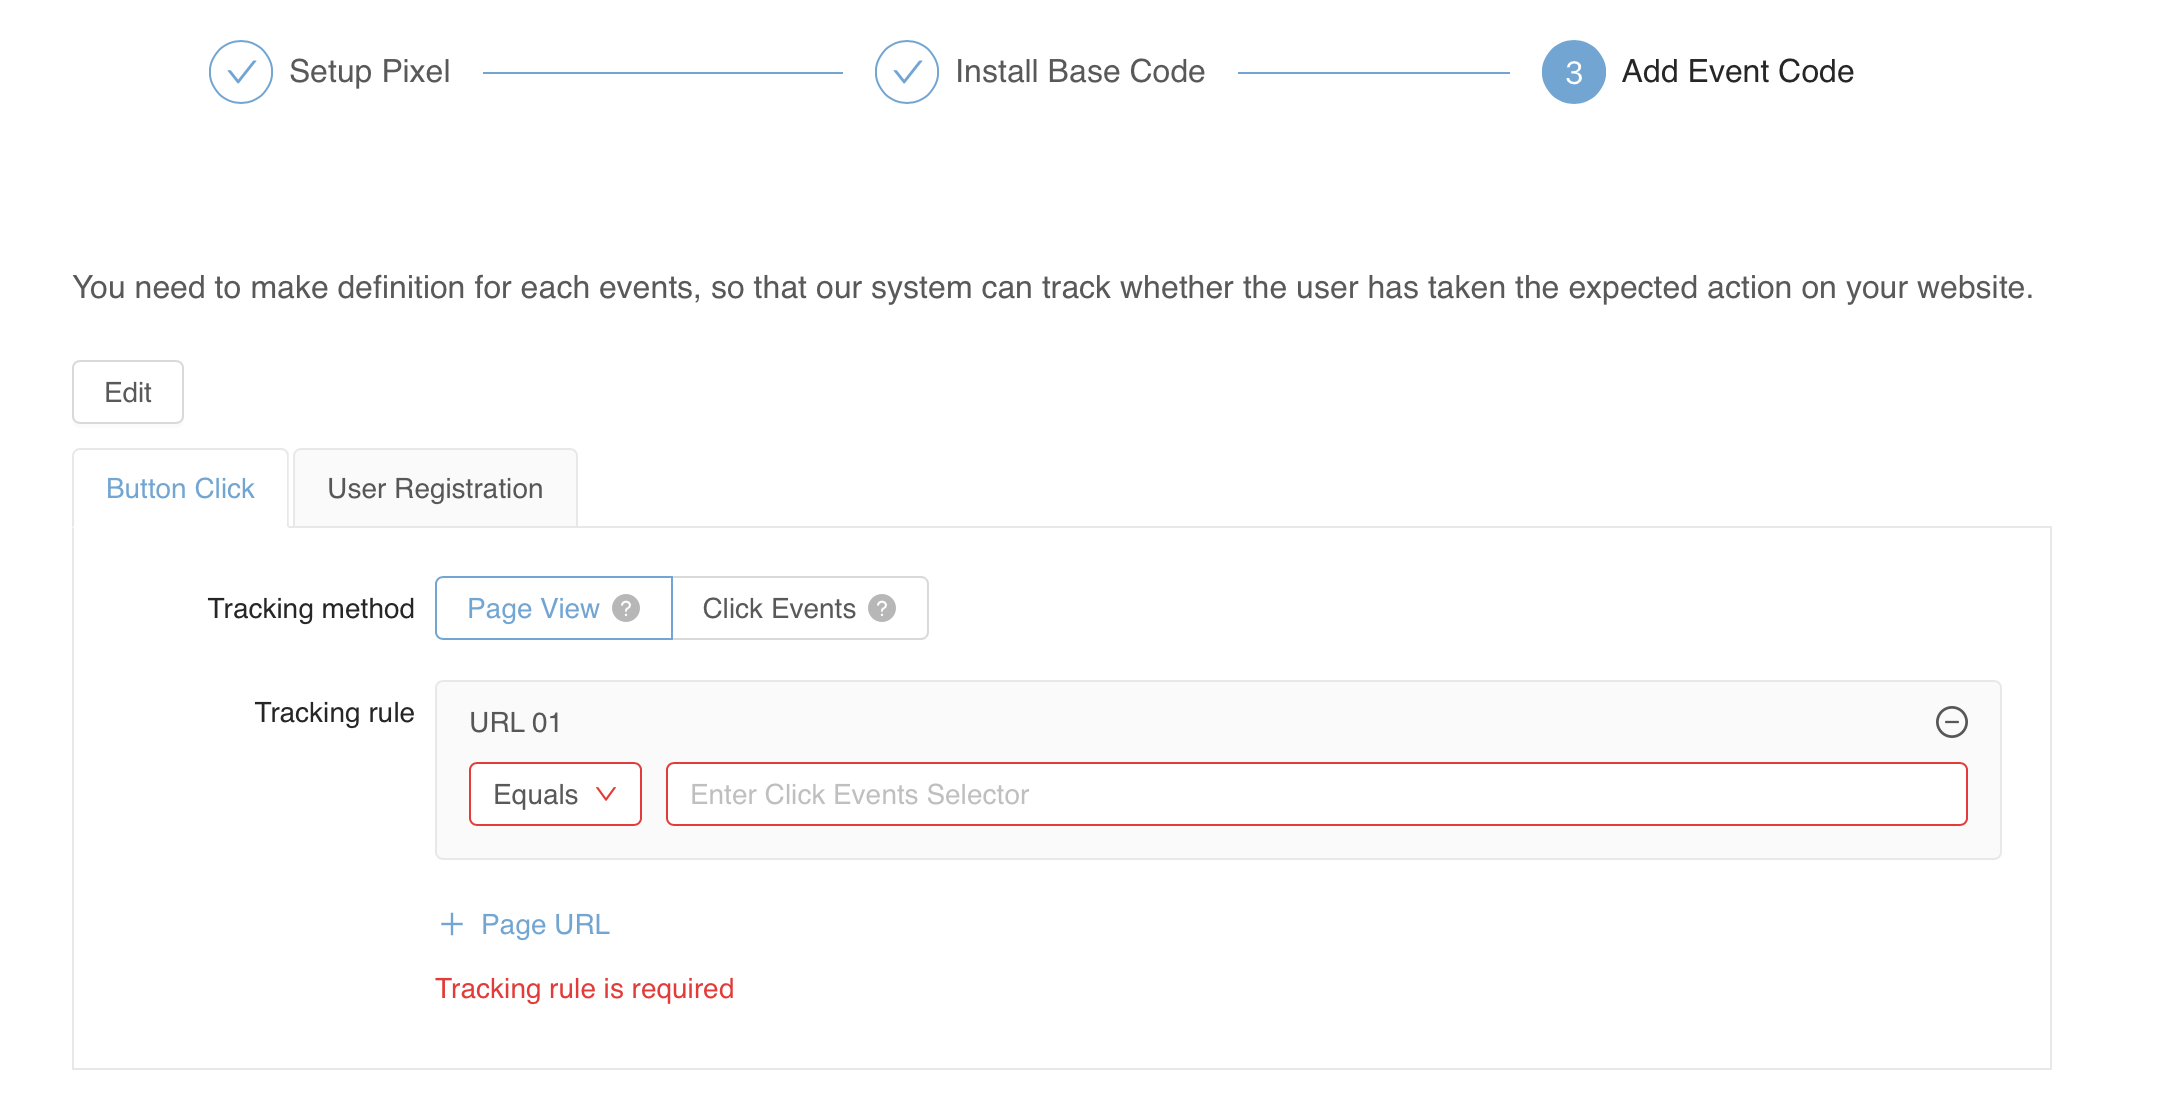
5.1 Standard Mode - Set up event code
You can choose tracking method for every event to be ‘page view’ or ‘click events’.
5.1 Standard Mode - Implement event code
5.2.1 Events defined by page viewing:
Indicate all pages needed to be tracked for this event.
5.2.2 Events defined by button click:
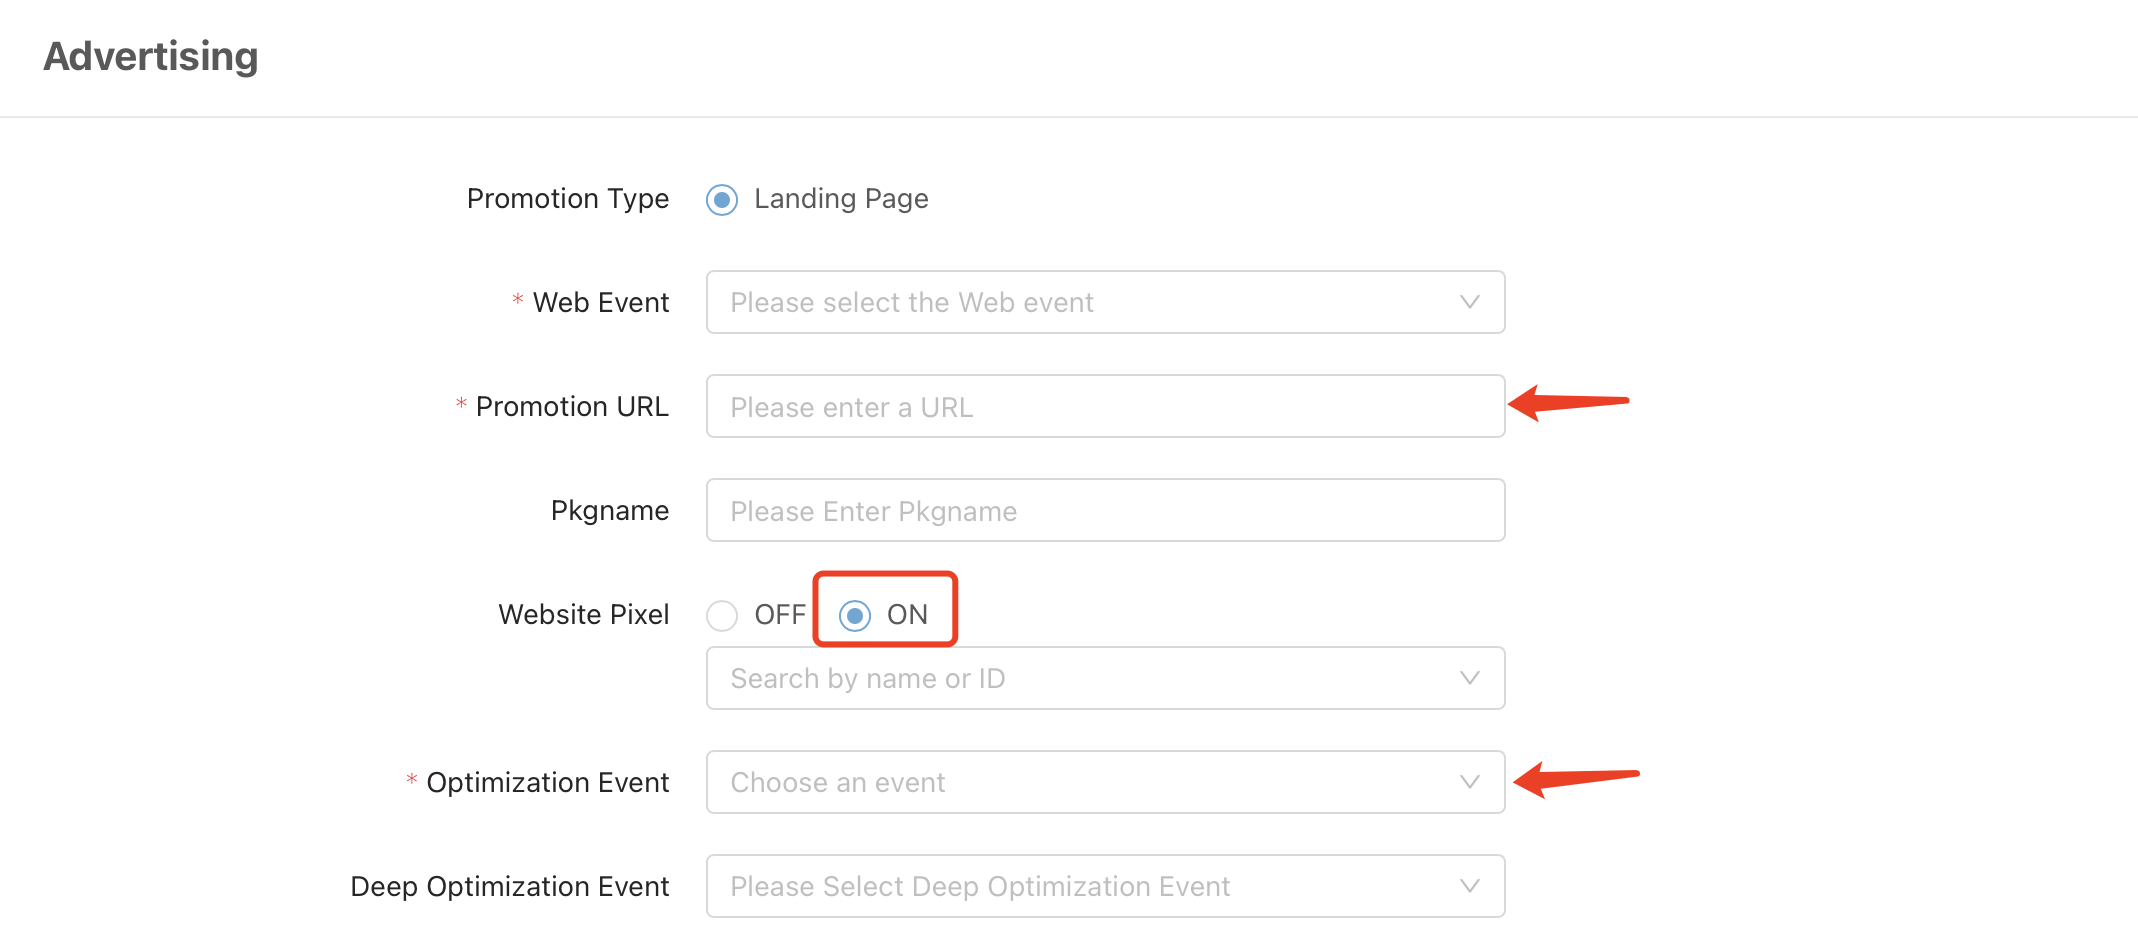
a. Input promotion URL, click on Update.
b. Browse on the page, go to the page with elements that you want to track clicks from.
c. Click on “Element Selection”, select the element, click “Exist Selection”, one rule will be created for this click event.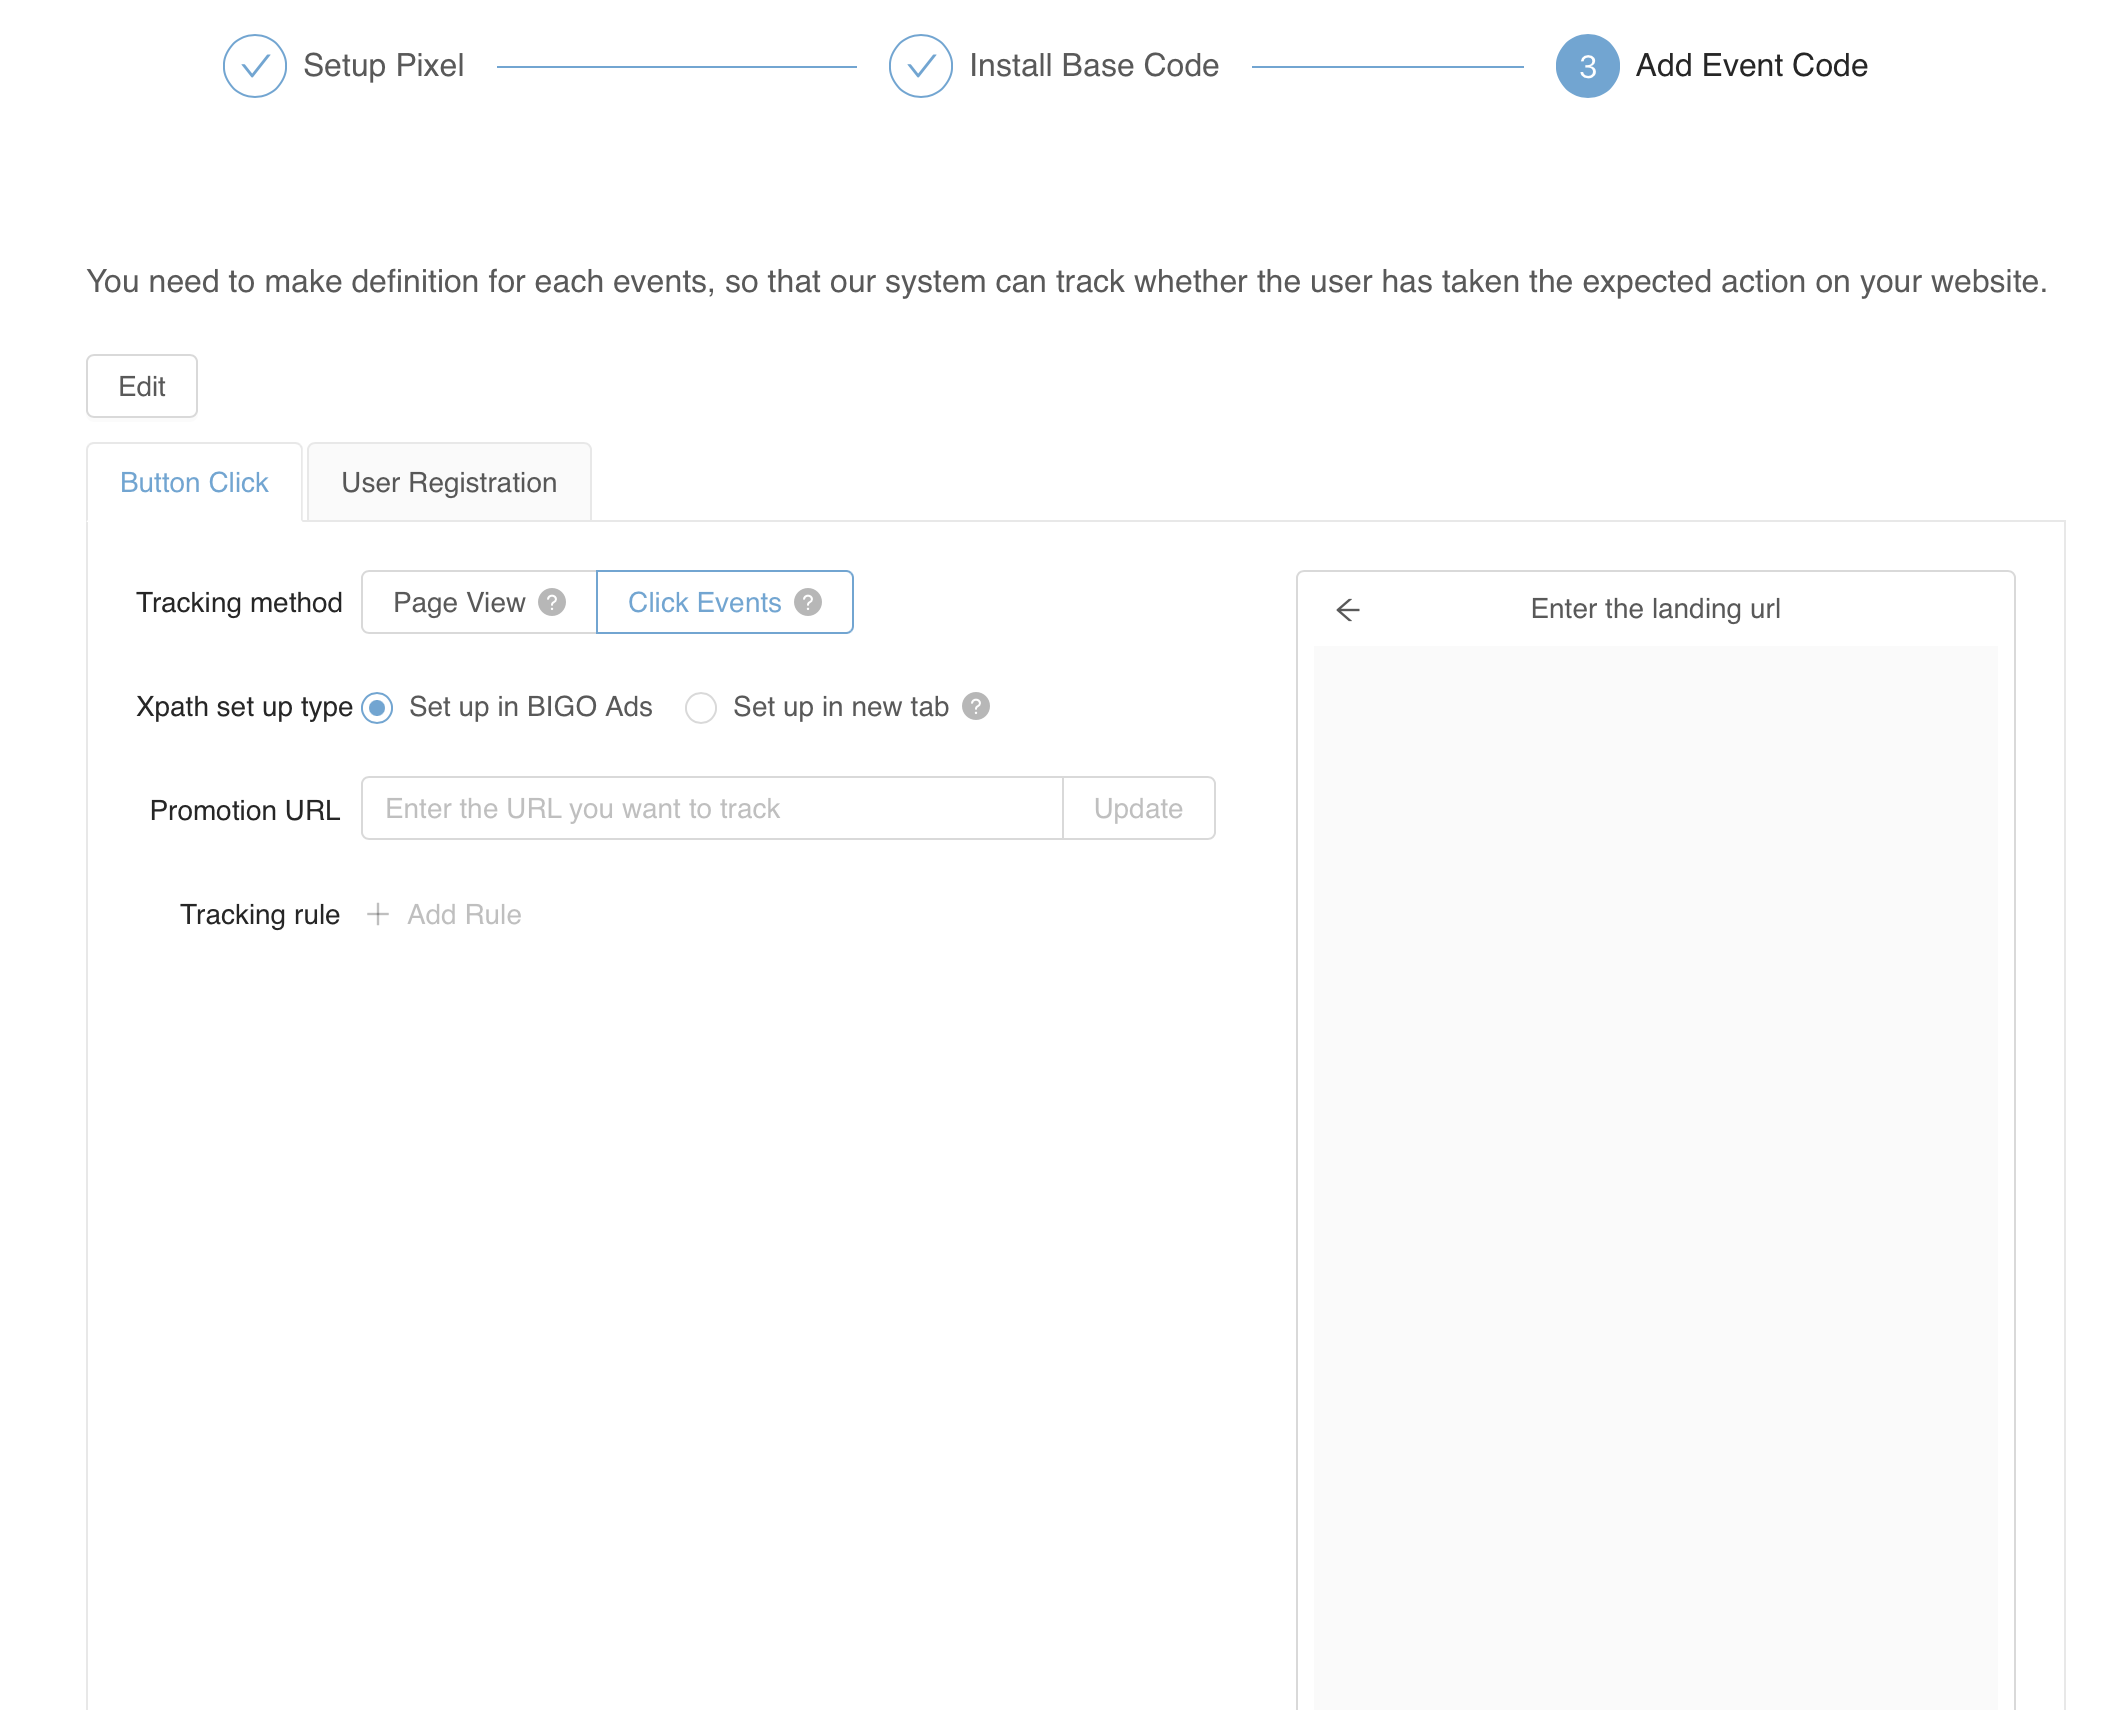
5.3 Developer Mode - Set up event code
Select your business type and event code.
Note: The corresponding code in different events are different.
5.3.1 You can name different events, which we will show the corresponding name in detail page.
5.3.2 You can choose tracking method for every event to be ‘page load’ or ‘clicks’.
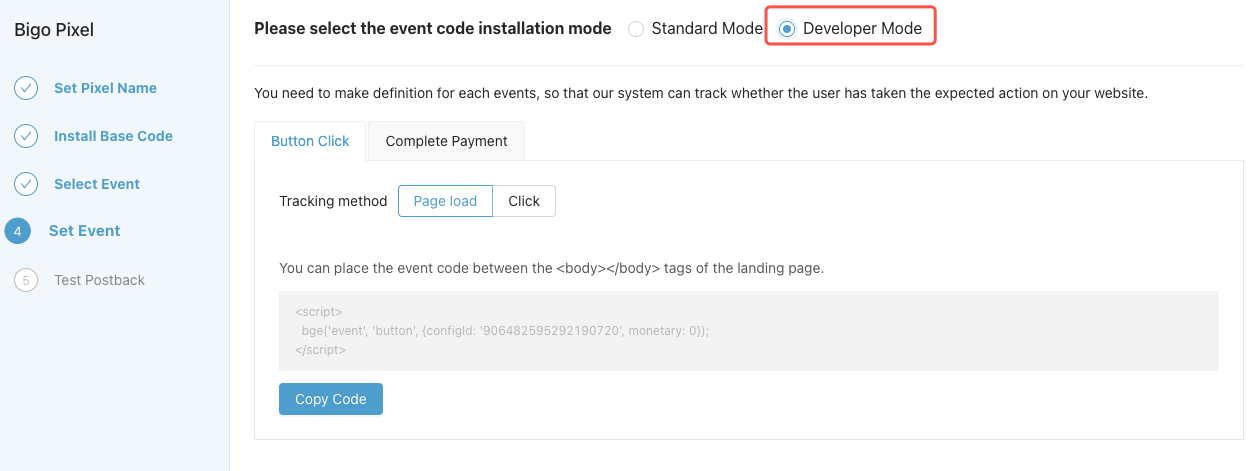
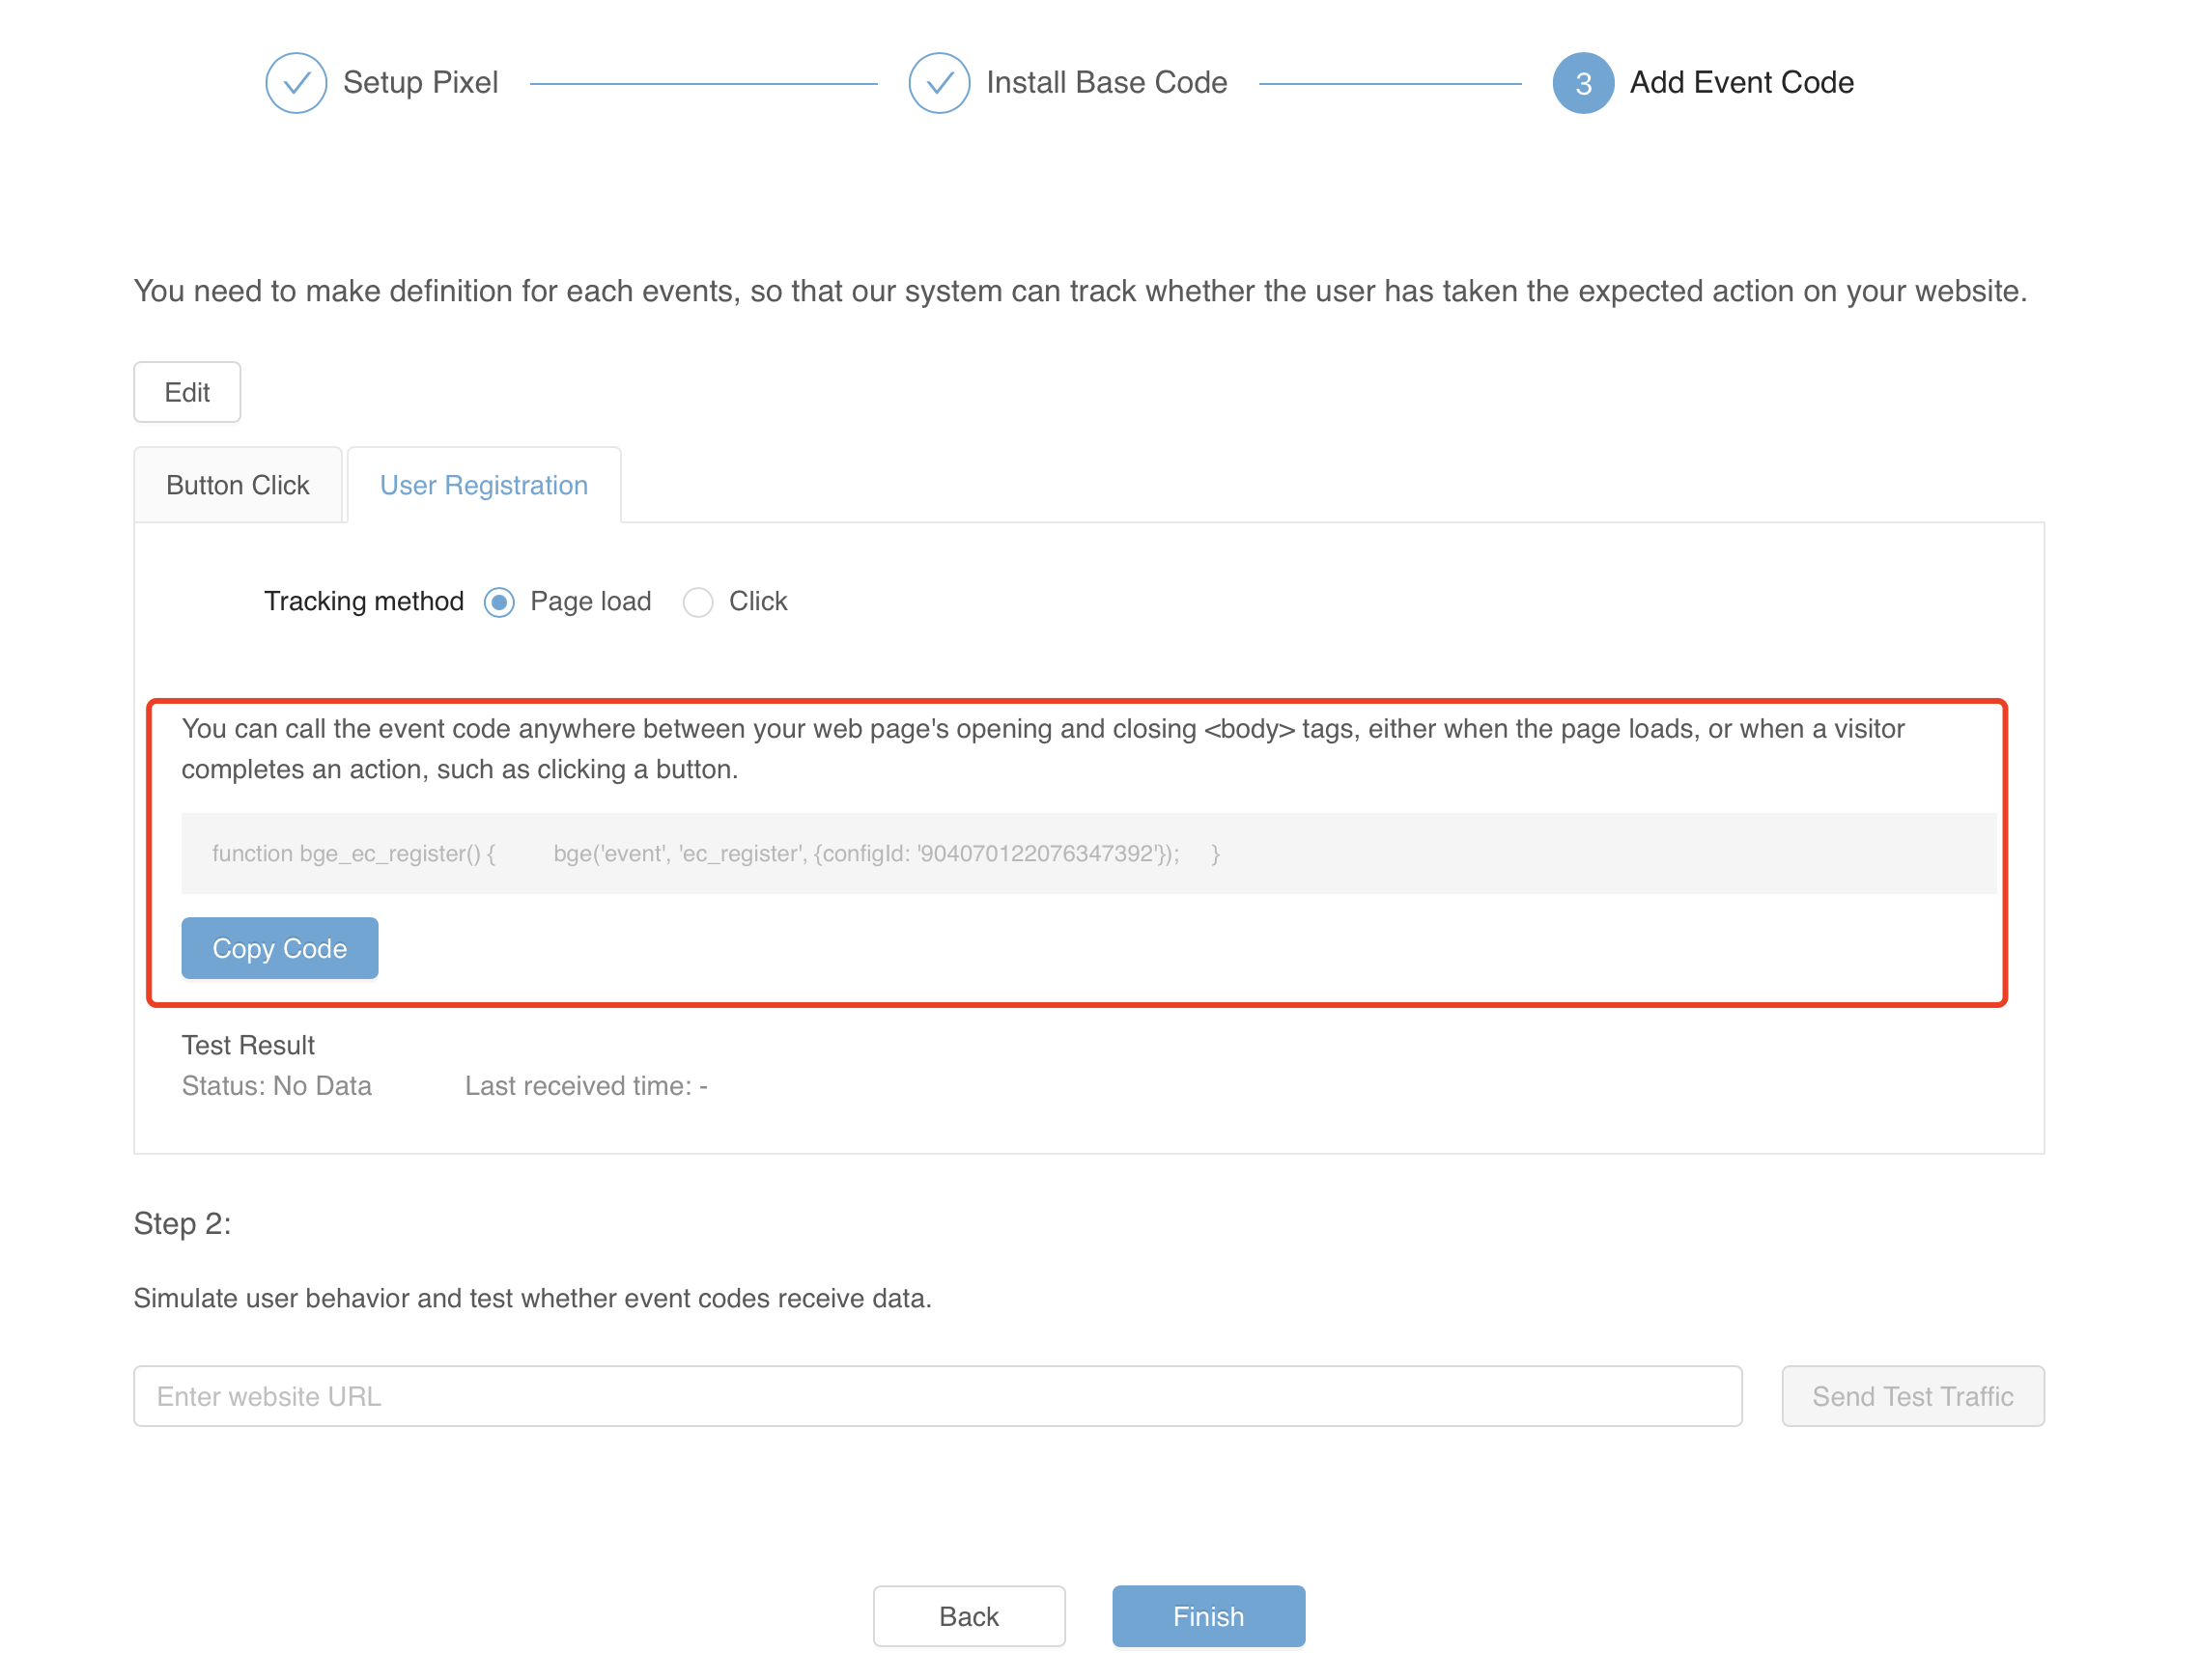
5.4 Developer Mode - Implement event code
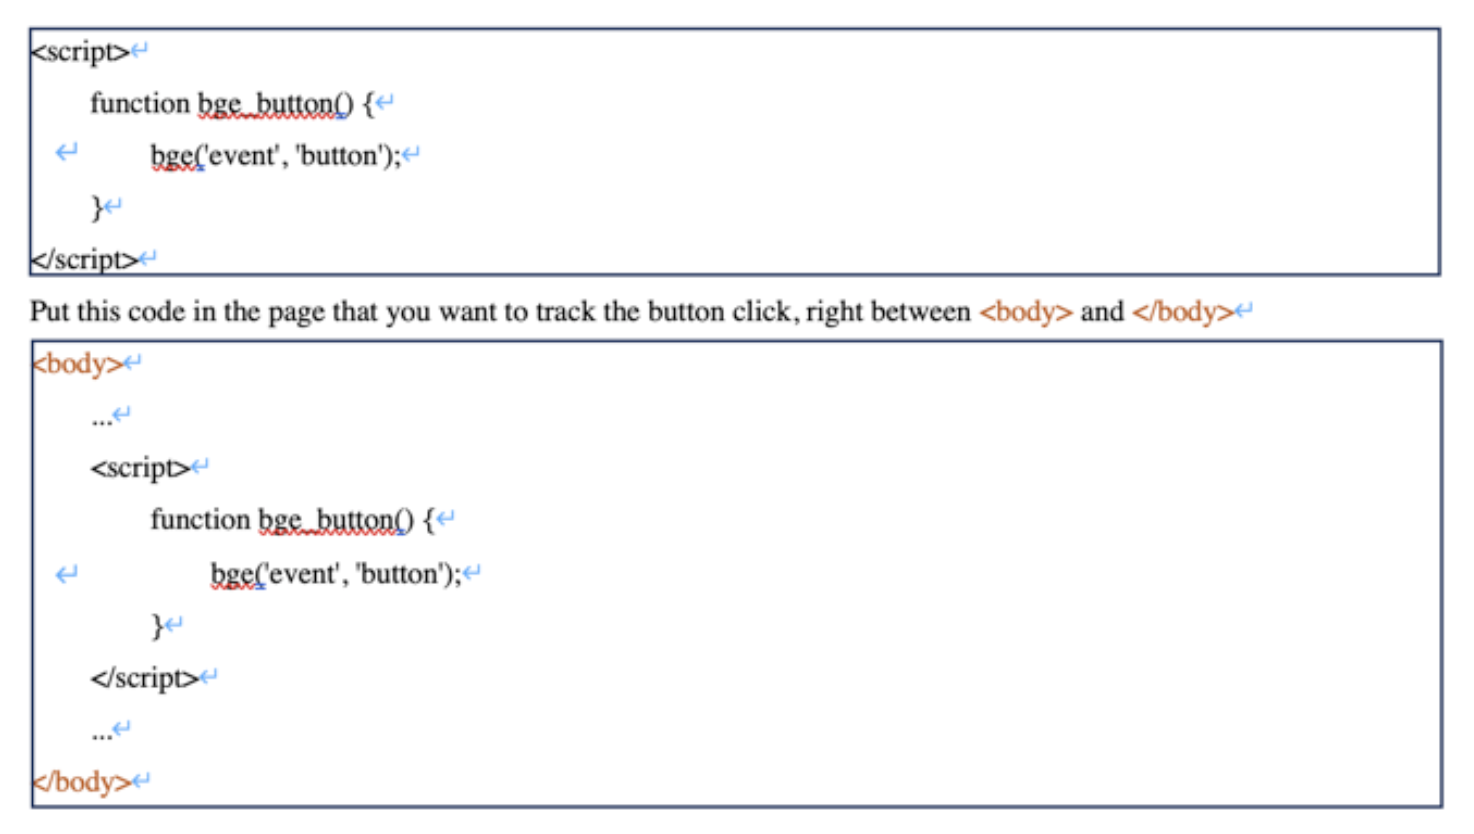
Select the action of your optimization goal, copy the corresponding event code of BIGO Ads and then paste between <body> and </body>.
Note: The following is an example, please refer to the pixel code on BIGO Ads.If you get a Button click event code as below:
6. Test Pixel
6.1 Finish and pixel is created successfully.
6.2 Path: [Library]→ [Website Pixel]→[Create] →click on pixel name→ [Check Pixel code installation].
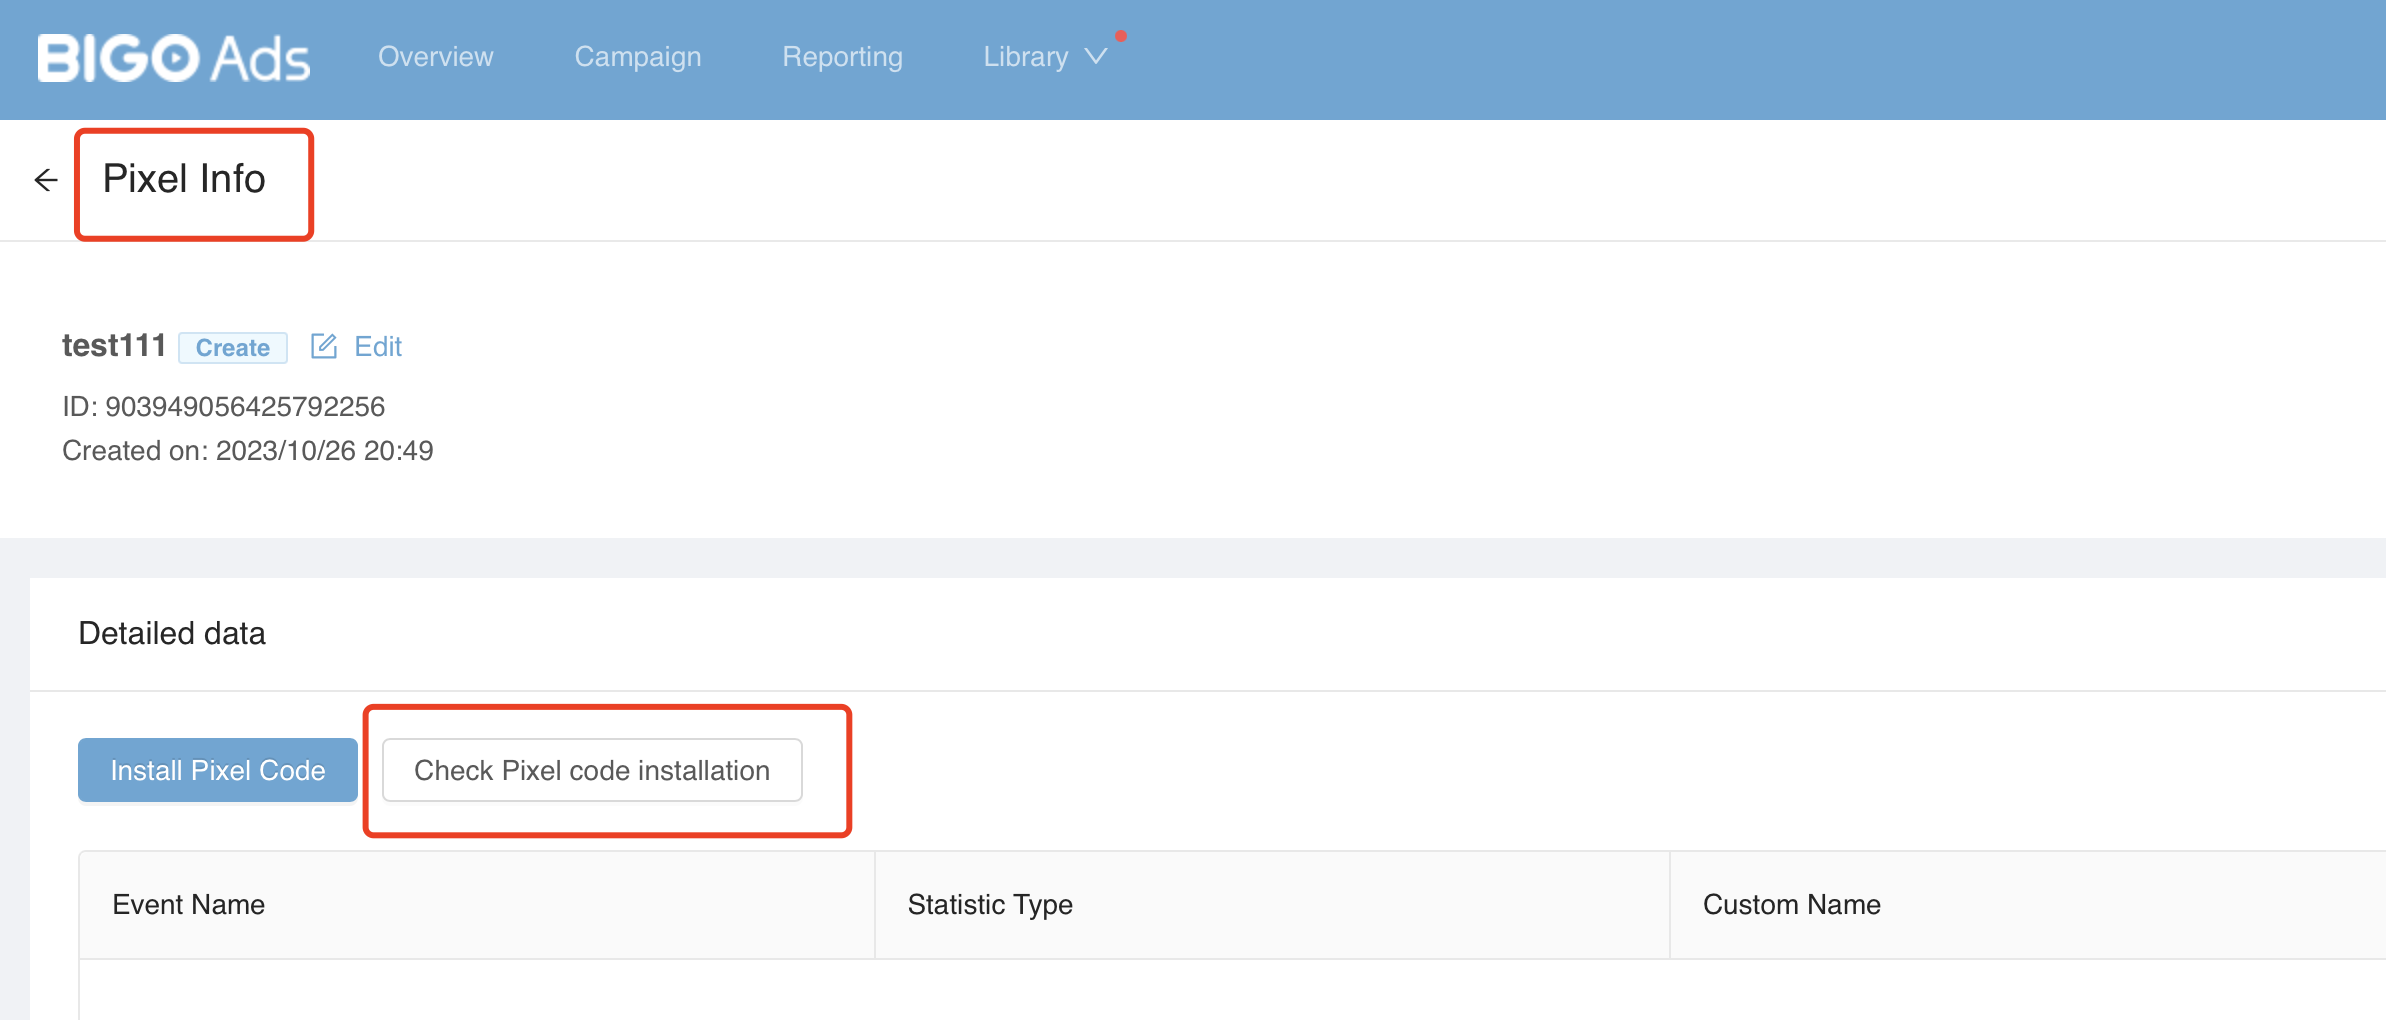
6.3 Enter promotion page url →[Send Test Traffic].
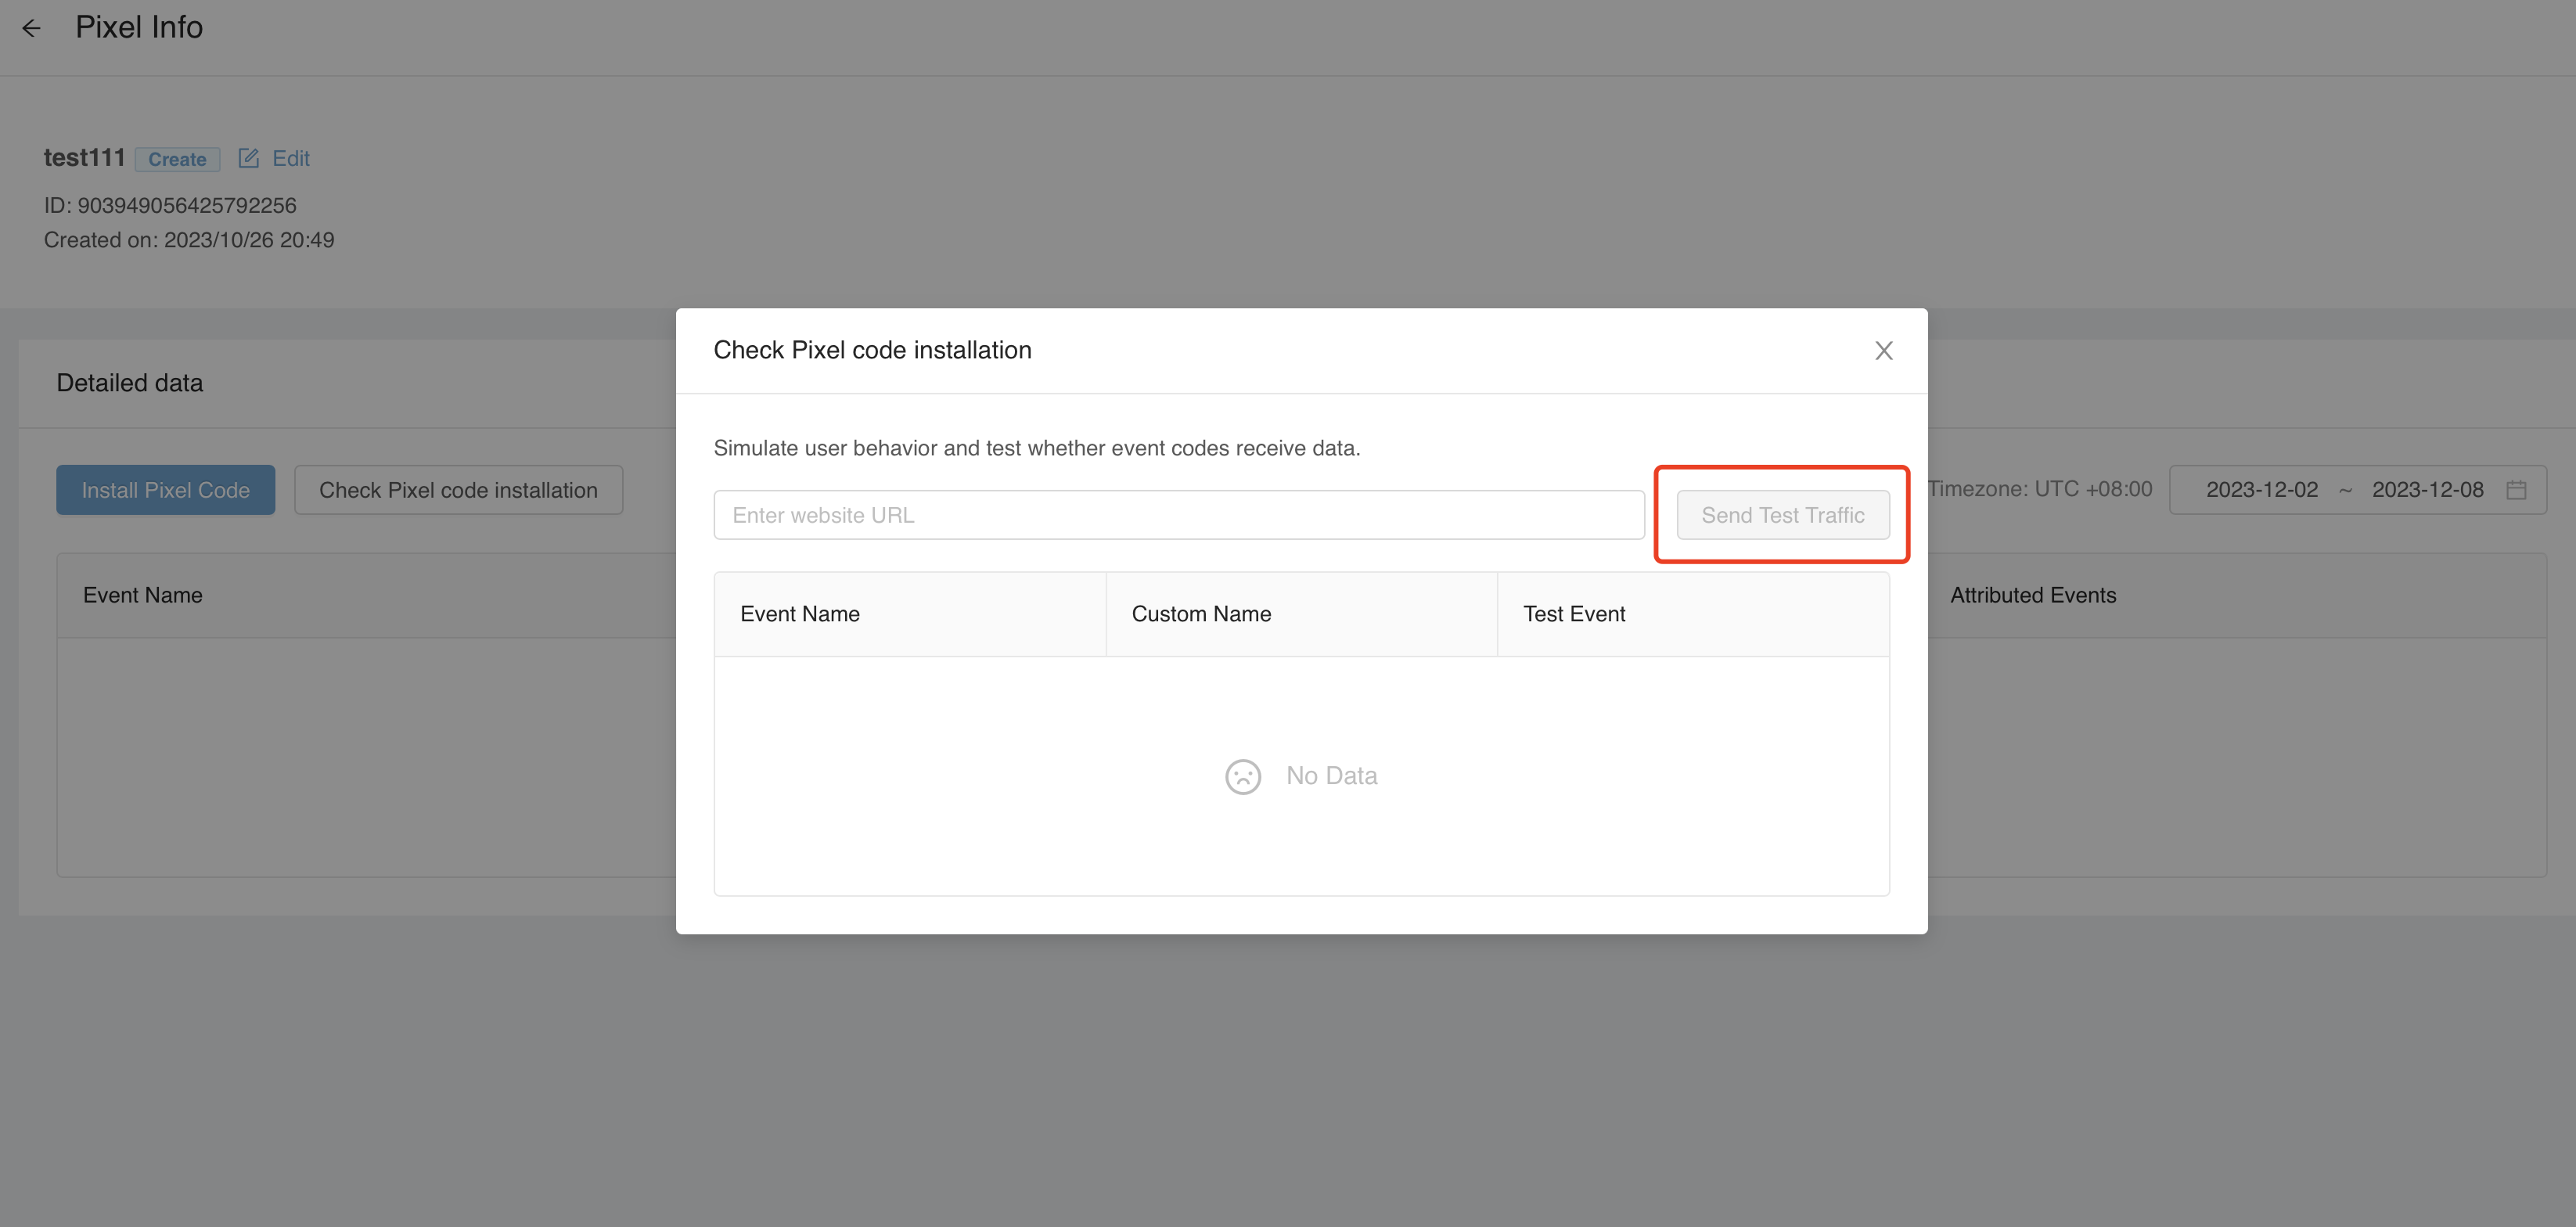
6.4 Mimic behaviors of users on the traffic testing page. It is better to go through the whole process on the page including page view, button click, form submission or add-to-cart, etc.
6.5 Go back to the pixel page and check if there is new event recorded. If you could see your actions being tracked and counted, then the pixel is installed correctly. If not, move on to next section.
7. Inspect pixel code
*You could skip this page if all your events are recorded in the last step(‘Test Pixel’).
7.1 Open the promotion link, and press F12 on your keyboard to trigger the below page.
7.2 Press “Ctrl+F” to get the searching tool, and search for the event code you have implement:
If there are codes but you don’t see any events being tracked, send screenshot as above with account number and promotion page to your Account Manager.

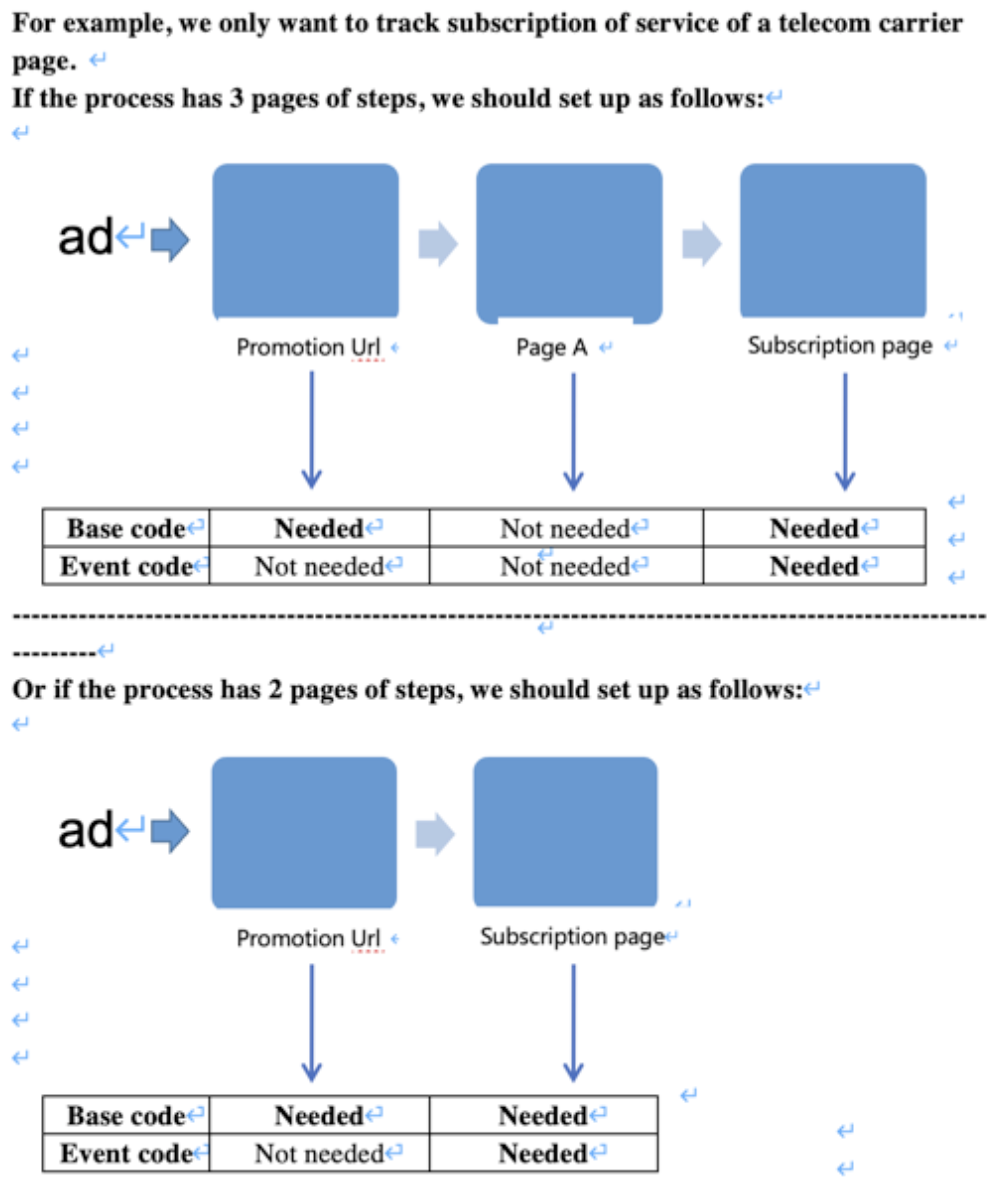
8. Note
We need to both add the base code in promotion url and in the subscription/conversion page where we want to track event.
Adding base code is a must step that we can track the entire route successfully.
9. Create a Campaign with Pixel
9.1 Choose “Conversion” in advertising objective.

9.2 Fill in your promotion url. For e-commerce vertical, please fill in your product link.
Select your pixel and goal events. In the beginning, recommend to choose shallow-funnel events such as “Button Click” or “Add to Cart” to optimize, which will be more helpful for ads to pass the learning phase more quickly.
Note: Only events that have displayed data on Bigo dashboard or tested in “Check Pixel code installation” tool could be available and chosen as Optimization Event.
9.3 In bid part, choose “conversion” as the optimization goal which bidding model is oCPC. And remember to choose“Optimize Conversions at Learning Phase” in Bid Strategy.
10. Share pixel between Business centers and ad accounts
10.1 Create a pixel and test successfully in one ad account(Account A). Copy the pixel id.
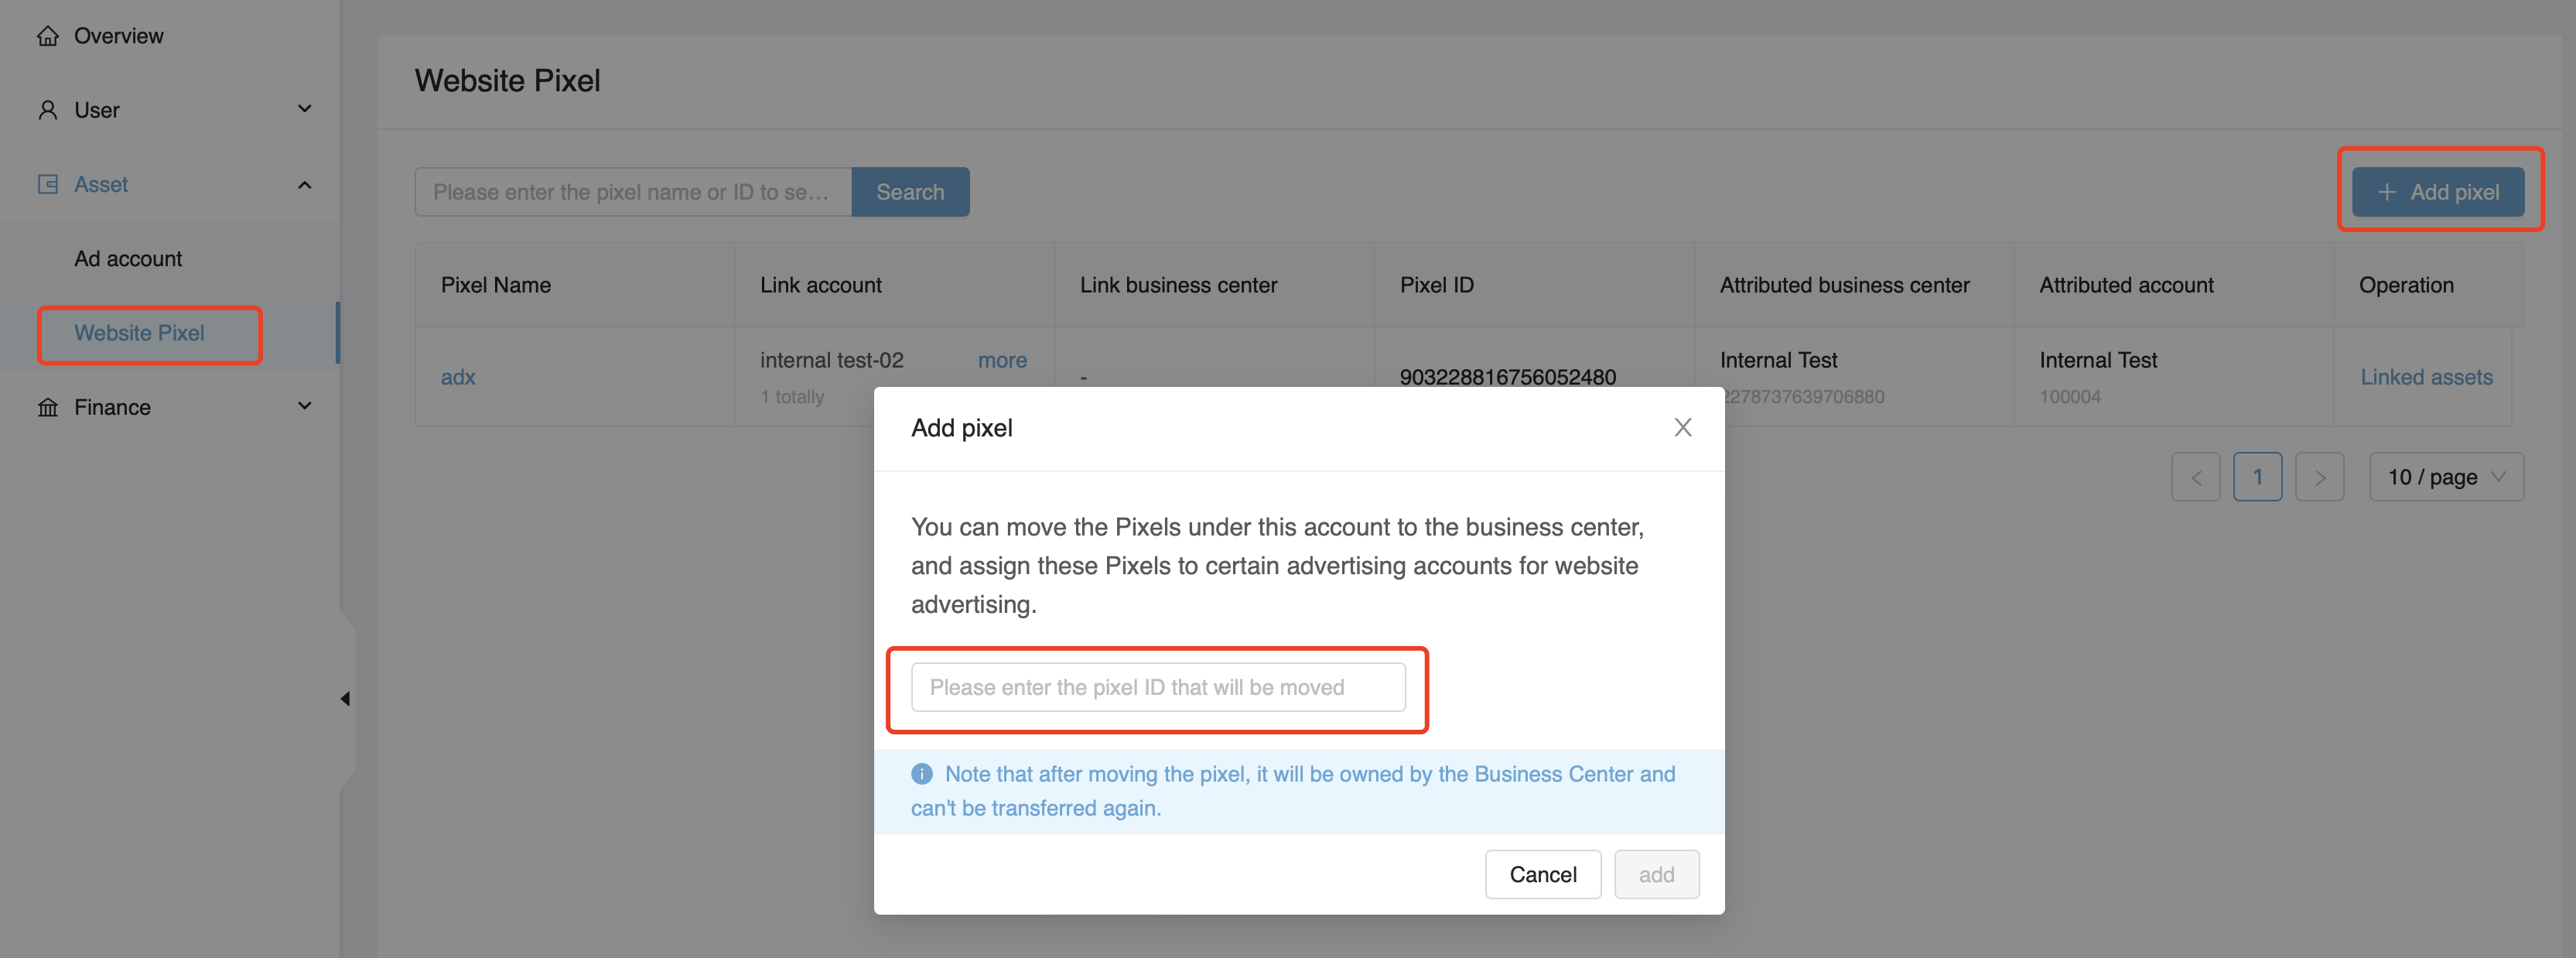
10.2 login to the business center of this ad account(Account A), go to [Asset] - [Website Pixel] – [Add Pixel] and fill in the pixel id and submit.
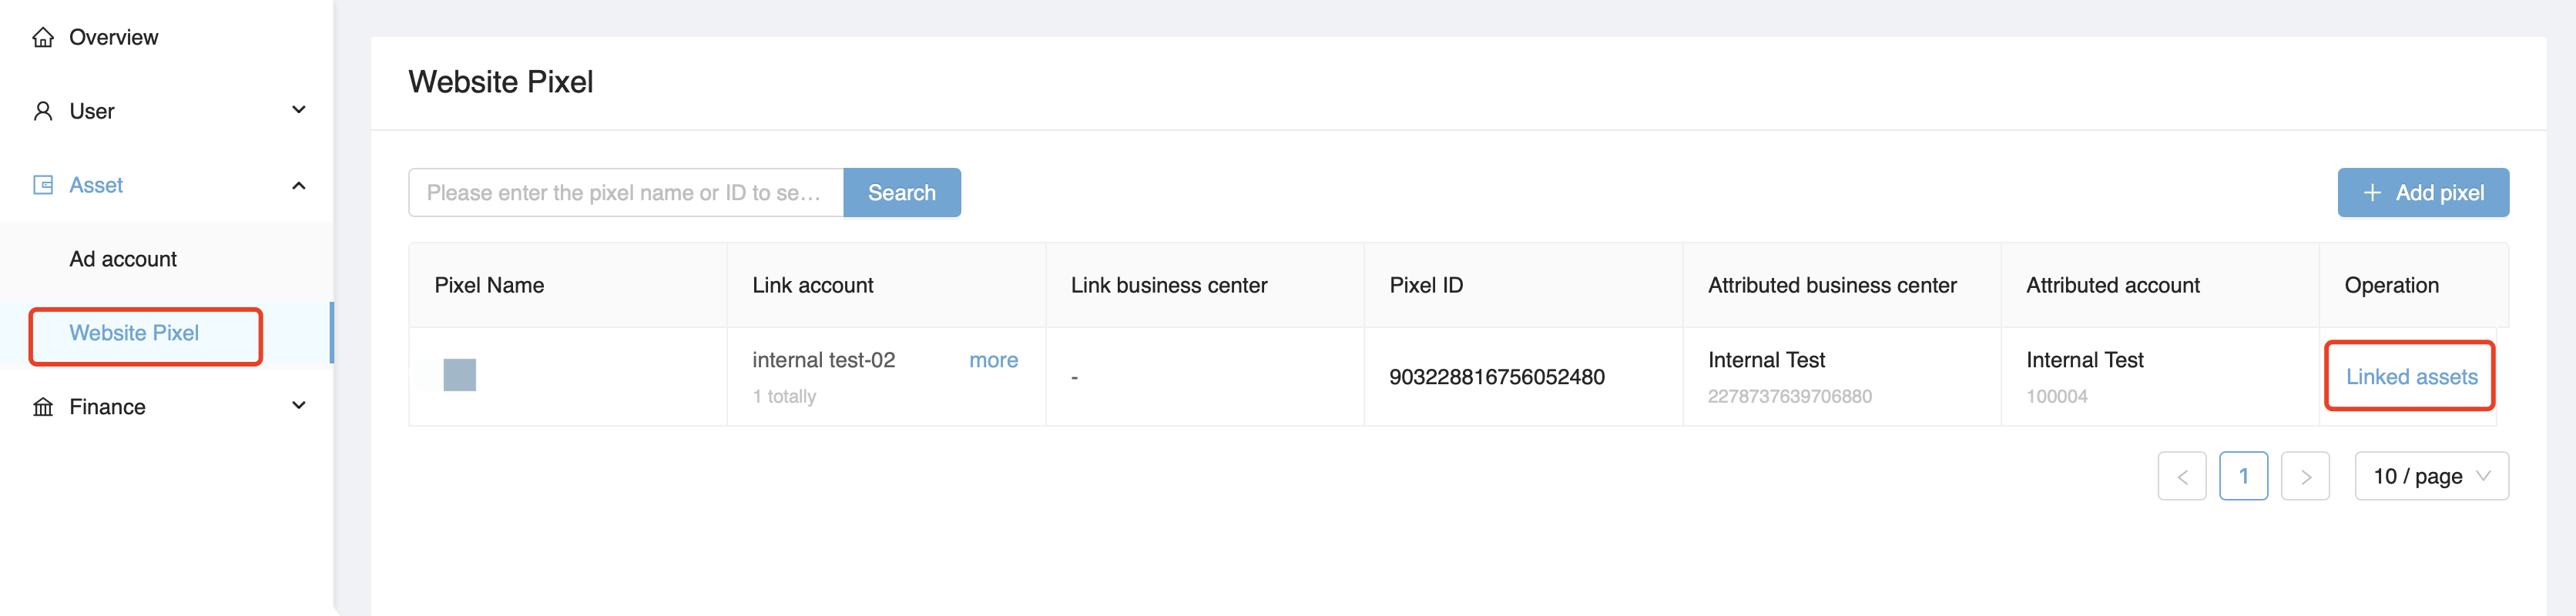
10.3 Click on [Linked assets] and choose the ad accounts or business centers you want to share this pixel and [Save].
10.4 Note:
- Only the same pages could share one pixel.
- Pixels tagged as [shared] cannot be edited, if any change needed, you need to change the original pixel id tagged as [created]. Once change is made, all [shared] pixels would be changed.
- Only admin of the Business center can share pixel.